Before we get started I have a request. One of our readers emailed with a question about our kitty, Ziggy. Well, is my face ever red. I accidentally deleted it before I replied. OPPPSSS! Monica, would you please email again so I can give you a proper answer? Thank you 🙂
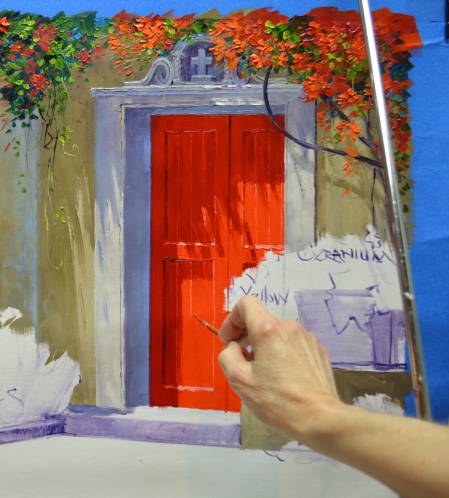
OK, let’s get back to the easel. Now the walls are complete I can add the Trumpet Vine cascading down.
I love the decorative stone lintel over the door. I use several mixes of White + Ultramarine Blue + Cadmium Orange + MUD for the shadowed areas. The part of the pillar in the sunlight is made of White + a little bit of Ultramarine Blue + a touch of Cadmium Orange.
Anyone who reads my blogs very often knows I like Red doors. The shadows are Cadmium Red Deep while the highlights are pure Cadmium Red Light. My wrist is braced against a mahl stick to steady my hand in order to define the edges of the individual boards. What is a mahl stick? CLICK HERE to find out.
Hand forged wrought iron ring pulls add the finishing touch.
Steps disappearing behind the arched opening give an air of mystery to our courtyard. HMMMMM, where do they go? They are made cooler as they ascend so they’ll recede. An easy to remember rule makes painting steps quite easy. The upright plane is darker than the top of the step. This is because light from above illuminates the flat surface. Less light hits the sides, or risers, therefore they are darker.
The Mexican tile floor is first covered entirely, establishing the light and shadow pattern. The terra cotta colors are made from mixes in various proportions of MUD + Cadmium Orange + White. Ultramarine Blue is added toward the back edge to make it recede.
 The crevices separating the tiles are drawn into the paint of the floor while it’s still wet. A thin, fine liner brush etches into the paint, giving the appearance of grooves between individual pavers. I appreciate you following along. And please, always feel free to ask questions. Hugs,


February 6, 2015 at 8:33 PM |
I love your blog and really appreciate your tips, I’ve learned alot! This painting is coming together beautifully. Do you have any insights to share on shadow placement and how you go about determining your light source and shadow placement when planning your paintings? I’m just beginning to make up scenes to paint rather than sticking closely to reference photos and I want to get the lighting and shadows accurate to maintain a level of realism.
February 8, 2015 at 8:28 PM |
What a great question. Jack and I make it a point to study shadows all the time. In fact we have a file of shadow photos. When he started teaching me to paint he said, “Think of sunlight as water. Imagine you have a bucket of sunshine, splash it across the painting. It will light up the objects it splashes on. The area behind the object won’t get wet, or any light. Therefore it will cast a shadow.”
One rule that Jack swears by is to have the light come into the painting from the left. This is because we read a book from left to right. You follow the light through the painting. Then make a dark upright on the far right of the piece to “STOP the Light” from flowing off the canvas. A tree in a landscape or in my case a stand of hollyhocks by a door. I usually have the light coming from the upper left but for variety I will bring it in from the upper right side. You can cut out a little sun face to stick on the easel above your painting as a reminder where the light source is. The next time the sun comes out drive around your area and observe the cast shadows, this really helps when you are making up the light in a piece. Thank you for following my blog. HAPPY PAINTING, Mikki
February 7, 2015 at 8:20 AM |
Mikki,
Enjoying the step by step. I really appreciate your blog.
Is there any chance you could record a short video of your actual brush strokes? It wouldn’t have to be a long video, just a bit so that we could see how you actually apply the paint. That would be really helpful. Thanks!
February 9, 2015 at 1:36 PM |
Hi Michael,
My, oh my. I am so completely technically, electronically and computer challenged. But I will pull out the book on our camera and see if I can figure it out. Please don’t hold your breath, it may take a while 🙂
Mikki
May 13, 2015 at 4:52 AM
Hi,
Even I’ll be awaiting such a video that records how you apply the paint. Especially in leaves of say geraniums, since they are a bit thicker and stand upright or like a bowl, your strokes really make them very realistic.
May 13, 2015 at 4:54 AM |
Been exploring all your entries, this blog has become my go to for all inspirations. I always used to search on Google for the types of images that you paint and it’s like you have been connected to my dreams somehow and painted them all out for me too see…beautiful work! Thanks for the tip on light and shadows.