Archive for January, 2014

Hot Pink Bougainvilleas

January 31, 2014

SA0914 A Sunny Day at the McNay Step 6

Bougainvilleas add such vibrant color to the courtyard. #1. The mass of flowers are blocked in with mixes in different proportions of Permanent Rose + White. #2. The foliage is painted around the flower color. I usually follow this sequence, Flowers First, Leaves Last, when painting blooming plants. If the leaves were done first my brush would pick up the underlying green when painting the flowers, dulling their color.

SA0914 A Sunny Day at the McNay Step 7

Highlights on the pink bracts and adding long, draping streamers finishes the “Bogies”. After painting the foreground container I start to work on the floor.

SA0914 A Sunny Day at the McNay Step 8

The entire surface is covered, establishing the light and shadow pattern. The legs of the wrought iron bench are drawn into the wet paint of the floor. If I waited until the flooring was dry it would be very difficult to make the lines smooth.

SA0914 A Sunny Day at the McNay Step 9

The perspective lines of the terra-cotta tiles are now drawn into the floor. This is done freehand. Using the mahl stick would limit my movement, making it hard to pull the long, straight lines.

SA0914 A Sunny Day at the McNay Step 10

Now I finish out the basket weave pattern of the pavers in the McNay courtyard.

SA0914 A Sunny Day at the McNay Step 11

The bench is nestled by a large leaf Philodendron, making a cozy spot to sit. The dark color of the wrought iron is mixed by combining Alizarin Crimson and Pthalo Blue. Like with the legs, the back of the bench is drawn directly into the wet paint of the foliage behind it. That’s all for today. Have a wonderful evening and we’ll see you tomorrow. HUGS,

Mikki Senkarik signature JPEG

A Wedding Gift

January 30, 2014

SA0914 A Sunny Day at the McNay Step 1

This is a fun collaboration, a surprise wedding gift for a couple that was married at the McNay Museum in San Antonio. Jo and Joe, who are commissioning the piece, started collecting my paintings when I first began working in oils. For years before that I worked with Dr. Joe doing Medical Illustrations. They wanted a painting of the courtyard where the reception was held but to also combine a few of the architectural features from other places at the Museum. The first step is to make a pen and ink drawing for our  collector’s approval.

SA0914 A Sunny Day at the McNay Step 2

Jo said the sketch was just what they envisioned so let’s step up to the easel and get to work. I begin drawing the basic plan on the canvas with a brush dipped in a thin oil wash of MUD (Ultramarine Blue + Alizarin Crimson) + Liquin. If you would like to see any of these images larger just click on the picture.

SA0914 A Sunny Day at the McNay Step 3

The initial oil sketch is finished. I’ve covered the window area in a translucent wash of MUD + Liquin and Ultramarine Blue + Liquin.

SA0914 A Sunny Day at the McNay Step 4

I start painting on the building in the background. Artists work on a two dimensional surface, the canvas, striving to make it appear three dimensional. One rule that helps to give depth to a painting is Cool Colors Go Back, Warm Colors Come Forward. Brush stokes of blue are added to the most distant walls to make them cooler so they fall back. I’ve dragged a mixture of White + Ultramarine Blue + Cadmium Orange over the dark area of the window which is now dry. This gives the feeling of the lacy curtains inside. The trunks of the palm trees are now blocked in over the arches behind.

SA0914 A Sunny Day at the McNay Step 5

The window is painted over the ‘curtains’. My wrist is braced on a mahl stick to steady my hand as I delineate the mullions. What is a mahl stick? CLICK HERE to find out.  Thank you for joining me today, hope you’ll come back tomorrow! HUGS,

Mikki Senkarik signature JPEG

Together Forever

January 29, 2014

SA0814 Together Forever Step 1

Many of you have asked for another Angel on eBay so here we go. I’ve got her sketched up on the canvas and we’re ready to begin painting.

To go directly to the auction CLICK HERE

SA0814 Together Forever Step 2

The sky is painted first, then I begin on the Cardinals. Jack and I love these beautiful red birds. We have a pair, Mr. and Mrs. Chippers, that hang around our garden. I work wet-into-wet so Mr. Chippers’ wings fade into the background, giving the impression of movement. You can click on the image to see it larger.

SA0814 Together Forever Step 3

Now I start on the Angel’s wings and wavy hair.

SA0814 Together Forever Step 4

I bring out a couple of special colors, Cerulean Blue and Terra Rosa, for the skin tones. #1. Cerulean Blue + White. #2. Terra Rosa + White. #3. Terra Rosa + more White. #4. Terra Rosa + MUD (Ultramarine Blue + Alizarin Crimson) + White. #5. Terra Rosa + Cadmium Red Light + White. #6. Mix #5 + more White.

SA0814 Together Forever Step 5

Most of the face is painted with mixtures #2, #3, and #4. Mixes #5 and #6 are used for the Angel’s cheeks. The Cerulean Blue mixture is used on lower edge of the jaw line to help give the feeling of roundness. My wrist is braced on a mahl stick to steady my hand as I paint the details on the face. And since many of you have asked, Yes I did model for the angel!

SA0814 Together Forever Step 6

The bouquet of Roses is painted with mixes of Cadmium Red Deep + Magenta. Highlights on the fragrant flowers will be made with Cadmium Red Light.

SA0814 Together Forever 14x14Together Forever     14″ x 14″    Original Oil Painting Embryo

Many say Cardinals mate forever, don’t you think that makes them a perfect subject for a Valentine’s Gift?  They are friends with this Angel bearing an arm load of Red Roses and Pink Lilies. Let your Valentine know they are the special Angel in your life with Together Forever. And remember, this everlasting bouquet will bring smiles long after regular flowers and candy are gone.

CLICK HERE to go to the auction of Together Forever

SA0814 Together Forever 14x14 with tape

Together Forever is an embryo that measures 14 inches x 14 inches. It’s painted on a gallery wrapped canvas with finished sides. No framing is needed, it’s ready to hang on your wall. We even provide the hanger and nail. This size original oil painting retails in our galleries for $690 but to make it more fun we’ve started the bidding at 1 cent. That’s right, ONLY A PENNY! The auction ends Sunday, February 2 at 8 PM Texas (Central) Time.

CLICK HERE to go to the auction of Together Forever

HAPPY BIDDING,

Mikki Senkarik signature JPEG

Colorful Captivation

January 28, 2014

SA0714 Step 15

Let’s begin work on the crepe paper like blossoms of the Matilija Poppies. The blooms are blocked in with various shades of Ultramarine Blue + White, Dioxazine Purple + White and Pthalo Blue + White. This mass of color will provide the darks for the shadow parts of the white flowers. Then I begin painting the foliage with mixes leftover from the California Poppies growing on the left side of the piece.

SA0714 Step 16

When the foliage is complete it’s time to add the highlights on the Poppies. Pure White is used for those petals illuminated by the sunshine streaming across the courtyard. The thick paint is carefully ‘Laid’ on top of the underlying color. This way my brush doesn’t pick up any of the green and muddy the pure White.

SA0714 Step 17

The final step on the Matilija Poppies is to make the bright yellow centers. Can you see why many people call these “Fried Egg Flowers”? I decided to make the bed of Poppies extend all the way to the right edge of the canvas. I had previously planned to plant Delphiniums in the space to the right of the Poppies as you can see in the previous picture. Somehow it felt too cluttered as I got into working this area so I changed the plan. I do this when I’m gardening too. Believe me, it’s a whole lot easier to change flower beds in a painting than in the ground 🙂

SA0714 Step 18

Now for the Petunias in the foreground containers. The mixes are #1. Magenta + Dioxazine Purple + a little White. #2. Magenta. #3. Magenta + White. #4. Magenta + even more White. #5. Pthalo Blue + White. #6. Pthalo Blue + Liquin (This is for the deep shadow areas in the foliage). #7. Pthalo Blue + Lemon Yellow. #8. Pthalo Blue + more Lemon Yellow. #9. Mix #8 + White.

SA0714 Step 19

I work in the usual order to block in the Petunias: Flowers First, Leaves Last. Mixes 1, 2, 3 and 4 are randomly smooshed around to make the mass of color for the blossoms. Oh, if you’ll look at the bottom of the red gate you can see where I added Scarlett’s shadow!

SA0714 Step 20

Mixes 5 through 9 are used for the leaves. Painting the foliage around the flowers helps to give shape to the individual blooms.

SA0714 Colorful Captivation 30x36Colorful Captivation     30″ x 36″    Original Oil Painting

Well, Colorful Captivation is ready to ship to the new gallery in Sedona. Scarlett and Rhett are looking forward to seeing the majestic Red Rocks. But I did overhear Rhett talking with Jack about having to get back to NYC for the Super Bowl. He’s pulling for the Broncos. Guess it will be a short visit, just don’t tell Scarlett! Thank you for following my blog and also for your wonderful comments. I certainly appreciate hearing from all of you. Jack and I are blessed with such great readers!

AND…If you would like to receive an email every time I publish a new post please feel free to subscribe to my blog. CLICK THIS LINK and scroll to the upper right side of the page. You will see a heading EMAIL SUBSCRIPTIONS. Just enter your email address and click the button “Sign me up!”  It’s easy. If you enjoy my blog please CLICK the FaceBook LIKE Button. As we say in Texas, “Much Obliged!

Mikki Senkarik signature JPEG

Is That Scarlett and Rhett?

January 27, 2014

SA0714 Step 5

The lantern by the gate is drawn into the wet paint of the adobe wall. I love the shadow the light fixture casts. My wrist is braced on a mahl stick to steady my hand as the fine detail is delineated. What is a mahl stick? CLICK HERE to find out.

SA0714 Step 6

The shadows on the cheerful red garden gate are painted with a mix of Cadmium Red Deep + Magenta. The sunlit portion is pure Cadmium Red Light. The latch and hinges are then painted over the red while it’s still wet.

SA0714 Step 7

Now for the terra cotta tile floor. The entire surface is painted first, establishing the light and shadow patterns. I use mixes of Cadmium Orange + MUD (Ultramarine Blue + Alizarin Crimson) + White in different proportions for the tiled area. The perspective lines are drawn into the wet paint with a fine liner brush. This is done freehand, using the mahl stick would limit my hand movement and it would be difficult to make smooth lines.

SA0714 Step 8

Next the horizontal lines separating the individual tiles are drawn.

SA0714 Step 9

We’re done with the floor. Notice it’s bluer, or cooler, toward the back which makes it recede. This follows a simple rule: Cool Colors go Back, Warm Colors come Forward.

SA0714 Step 10

The Hollyhocks and Petunias are painted in my usual sequence of Flowers First, Leaves Last.

SA0714 Step 11

AND….look who decided to visit Sedona! It’s our favorite traveling Hummingbirds, Scarlett and Rhett. I guess it was just too cold in NYC where their home is, they’ve come to Arizona for a little vacation. If you are new to my blog these precious little Ruby-Throats are named after the main characters in my all time favorite novel, Gone With the Wind. If you’d like to see them larger, just click on the image.

SA0714 Step 12

The shadows on the southwestern style chair are painted with mixtures of Cadmium Yellow Medium + Cadmium Orange + a little touch of MUD. The highlights are Cadmium Yellow Medium + Lemon Yellow.

SA0714 Step 14

A cluster of California Poppies have sprung up next to the happy yellow chair. Hope you’ll come back tomorrow, we’ll be doing some more planting. Hugs,

Mikki Senkarik signature JPEG

Back to Sedona

January 26, 2014


SA0714 Step 1

Now, let’s get to work. This is another piece for our new gallery in Sedona, EXPOSURES Fine Art. The basic plan is sketched up on my canvas and I’m ready to begin painting.

SA0714 Step 2

The background is blocked in first with mixtures of Pthalo Blue + Cadmium Orange + MUD (Ultramarine Blue + Alizarin Crimson) + White. A lighter shade is used near the top of the wall and through the opening above the gate. This will draw the viewer’s eye to the mystery beyond the courtyard. You’ll see how this works when we’re farther along. Then I move to the roof tiles. The entire area is thickly covered with siennas made of various proportions of MUD + Cadmium Orange + a bit of White. Some of the background color is worked into the tiles, giving the feeling of moss growing on them. To learn more about our Double Primary Color Mixing System CLICK HERE.

SA0714 Step 3

The upper portion of the wall is roughed in so I can drag the Wisteria over the wet paint of the adobe. The Wisteria is painted in my usual sequence: Flowers First, Leaves Last. #1. The mass of blooms is painted first with mixes of Dioxazine Purple + White. #2. Then the green leaves are added, working around the flower color to help shape the blossoms. #3. Petals and leaves are highlighted as well as delineating the trunks of the vine.

SA0714 Step 4

We’ve got the Wisteria planted. Why do I paint the flowers first? This helps to keep my blossom color bright and crisp. It the leaves were blocked in first, my brush would pick up some of the green when painting the blooms, making their color muddy. So you see, there is method in my madness! If you would like to see this or any of the other pictures enlarged just click on the image. Thanks for visiting our studio today. Hugs,

Mikki Senkarik signature JPEG

Senkarik Paintables

January 25, 2014

Many of our blog readers have wanted to know if they can paint along with me, copying the steps of the pieces shown on my posts. Several have asked if I give painting lessons. This prompted an idea. Jack said, “Why don’t we come up with sort of a Paint by Number Kit that your readers can paint. That way they can learn from following your painting.”

Senkarik PAINTABLES JPEG

We tossed several thoughts back and forth, finally coming up with a name: Senkarik PAINTABLES!

OLYMPUS DIGITAL CAMERA

Our introductory offering is Pause and Enjoy.

Panel full with easel

The kit consists of an 11 inch by 14 inch giclee on canvas of one of my original oil paintings. The image is a lighter version of the original piece, giving you a pattern to follow.

Panel edge

The giclee comes mounted on a 3/4 inch cradled panel. When you’re finished with your piece you can either frame it or paint the sides and hang it on the wall.

Paint list-Color Mixing System-Instructions

Also included in the kit is a list of the oil paint colors needed for the project, an explanation of the Jack White Double Primary Color Mixing System and step-by-step instructions showing how to paint the piece.

This is READY TO PAINT. Just collect your paints, squeeze them out on the palette, put the panel up on your easel and start having FUN! You can purchase these kits on eBay for $48.99 plus shipping. CLICK HERE to go to the PAINTABLES on eBay. If you have any questions please feel free to email us at senkarik@senkarik.com.

HAPPY PAINTING!

UPDATE:  Do we have the best readers in the world or what? Our initial offering of Senkarik PAINTABLES sold out in 20 MINUTES! Jack and I want to extend a huge Texas MUCH OBLIGED to all of you. Are we going to have more? YOU BETCHA! We’ll have some different images too. I’ll be on the phone first thing in the morning with our printer, Miguel, in Florida. Stay tuned!

Mikki and Jack signature small  JPEG

Romance in Santorini

January 21, 2014

SA0614 Romance in Santorini Step 1

Valentine’s is right around the corner. How much more romantic can you get than a table for two overlooking the Cobalt Blue domes and Aegean Sea in Santorini? The first step on my eBay auction piece for this week is to sketch the basic plan up on my canvas in a thin oil wash.

CLICK HERE to go directly to my eBay auction.

SA0614 Romance in Santorini Step 2

The sky and water are painted first, then the distant bluffs are added. The ocean and bluffs provide a dark background to contrast with the crisp white church.

SA0614 Romance in Santorini Step 3

The dome is painted with mixes of Cobalt Blue + White. Next mixtures of White + Ultramarine Blue + Cadmium Orange are used for the walls of the distinctive church. MUD (Ultramarine Blue + Alizarin Crimson) is added to the mix for the shadows. Pure White is reserved for highlights.

SA0614 Romance in Santorini Step 4

Using paint leftover from the dome the latticed screens on the windows are delineated. You can click on the image to enlarge this or any of the other pictures.

SA0614 Romance in Santorini Step 5

Permanent Rose + White is used for the Bougainvilleas cascading over the building and terrace wall. The brilliantly blooming plants are painted in my usual sequence of Flowers First, Leaves Last.

SA0614 Romance in Santorini Step 6

After planting Geraniums I start on the floor. The entire surface is covered to begin with, establishing the light and shadow pattern. Using paint from the white buildings the wide grout lines are drawn into the wet floor.

SA0614 Romance in Santorini Step 7

Bright Cadmium Yellow chairs give a couple of sweethearts a place to sit and enjoy the view.

SA0614 Romance in Santorini 14x14

The picturesque village of Santorini is perched high on the bluffs of the southernmost of the Cyclades Islands in Greece. Wouldn’t you just like to relax and share a sip of wine with your Valentine as you look past the unique cobalt blue domes to the Aegean Sea? Bring a smile to the heart of that special someone in your life with the gift of Romance in Santorini. A Senkarik Original Oil Painting will last for generations, long after candy and flowers are gone.

SA0614 Romance in Santorini 14x14 with tape 1 and 2

Romance in Santorini is an embryo that measures 14 inches x 14 inches. To make it easy for you no framing is needed, it’s ready to hang on your wall. We even provide the hanger and nail.

This size original oil painting retails in our galleries for $690 but to make it more fun we’ve started the bidding at 1 cent. That’s right, ONLY A PENNY! The auction ends Sunday, January 26 at 8 PM Texas (Central) Time.

To go to the auction for Romance in Santorini CLICK HERE.

HAPPY BIDDING,

Mikki Senkarik signature JPEG

Takin’ A Sunbath on eBay

January 18, 2014

SA0314 Takin' a Sunbath step 1

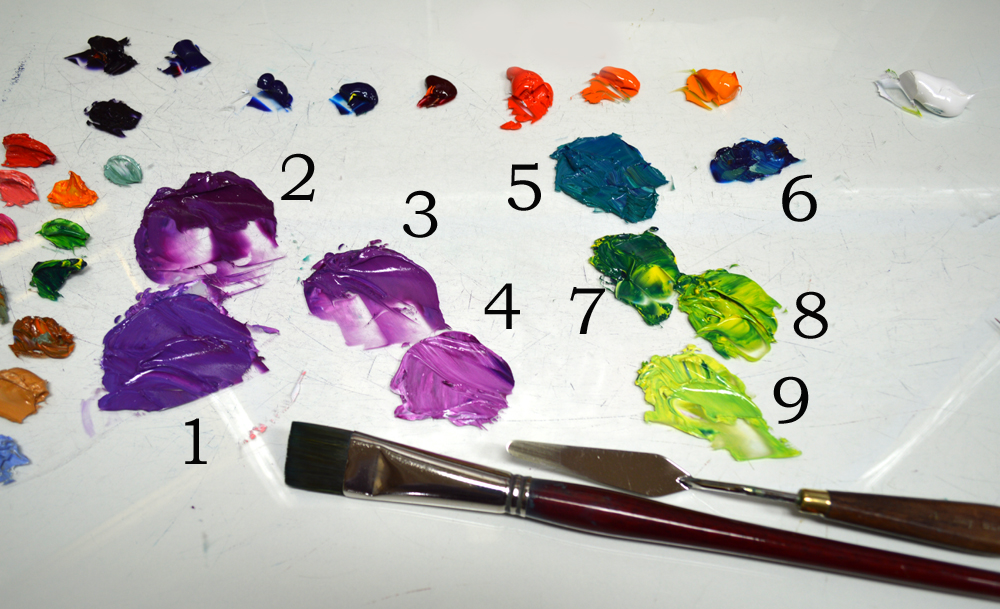
Today let’s travel to Provence. Villefranche to be exact, a picturesque village located on the coast of France between Nice and Monaco. After sketching the composition on the canvas with a thin oil wash I begin blocking in the soft pinkish walls. Mixes in varying proportions of MUD (Ultramarine Blue + Alizarin Crimson) + Cadmium Red Light + White are used.

CLICK HERE to go directly to the auction

SA0314 Takin' a Sunbath step 2

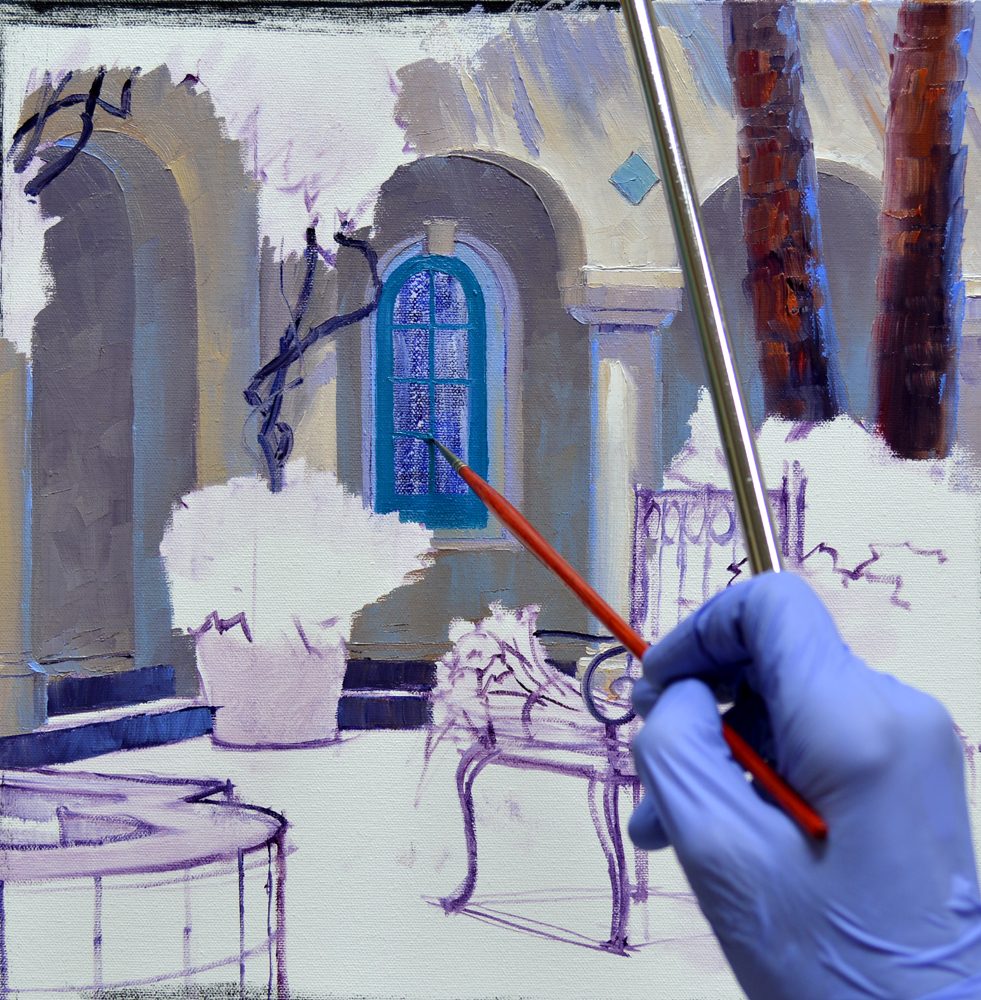
Several of my followers have asked how I paint the lacy curtains that show up occasionally in my pieces. First the window area is covered with a translucent oil wash of MUD + Liquin. That is allowed to dry, then I lightly drag the curtains over the washed in area using mixes of Ultramarine Blue + White and MUD + White. I make sure to let some of the dark show through. This layer will serve as the shadows of the filmy material.

SA0314 Takin' a Sunbath step 3

When the door and mullions separating the window panes are complete I come back and highlight the curtains illuminated by the sun. Pure White would be too bright, I add a little white to the curtain mixtures leftover from the previous step. You can click on the image to enlarge any of the pictures.

SA0314 Takin' a Sunbath step 4

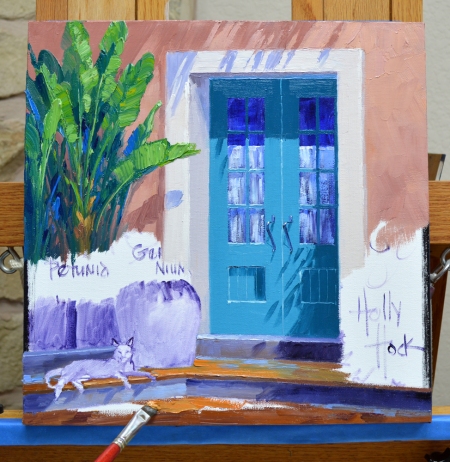
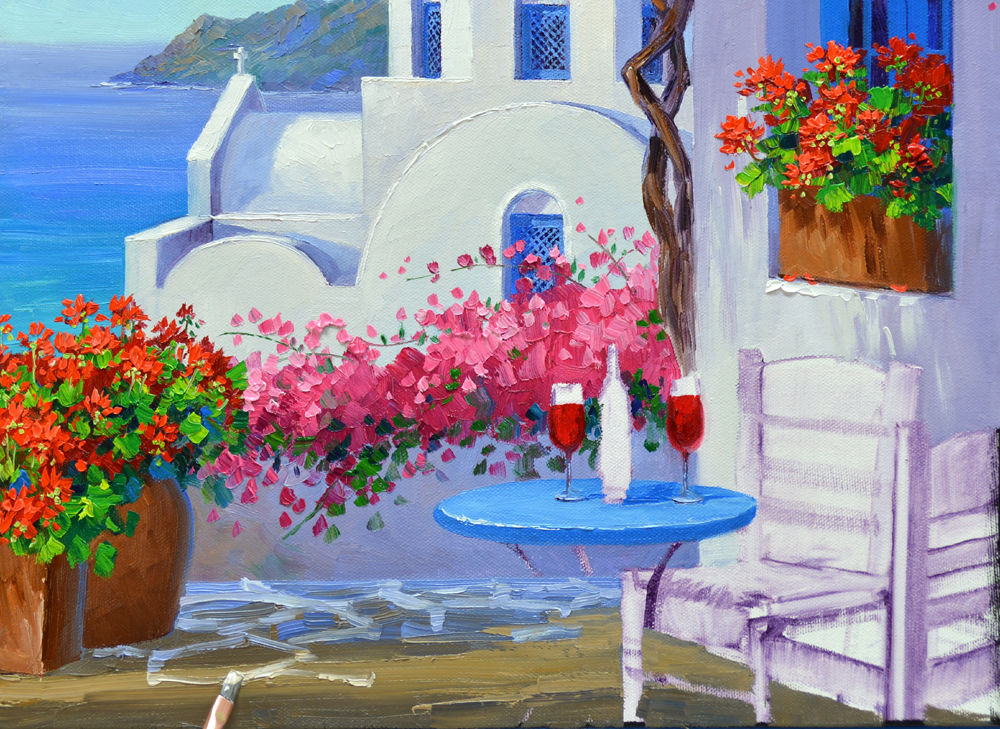
Giant Birds of Paradise provide a dark upright on the left of the door. This prevents the sunlight streaming into the painting from the upper right from going off the left edge of the canvas. The huge leaves direct the viewer’s eye down to the flower pots and cat. Don’t you like the unusual arrangement of the steps leading up to the double door?

SA0314 Takin' a Sunbath step 5

Now for that precious little kitty snuggled by the terra-cotta containers. I block in the basic color of his coat with mixes of MUD + Cadmium Orange + a little Ultramarine Blue + White.

SA0314 Takin' a Sunbath step 6

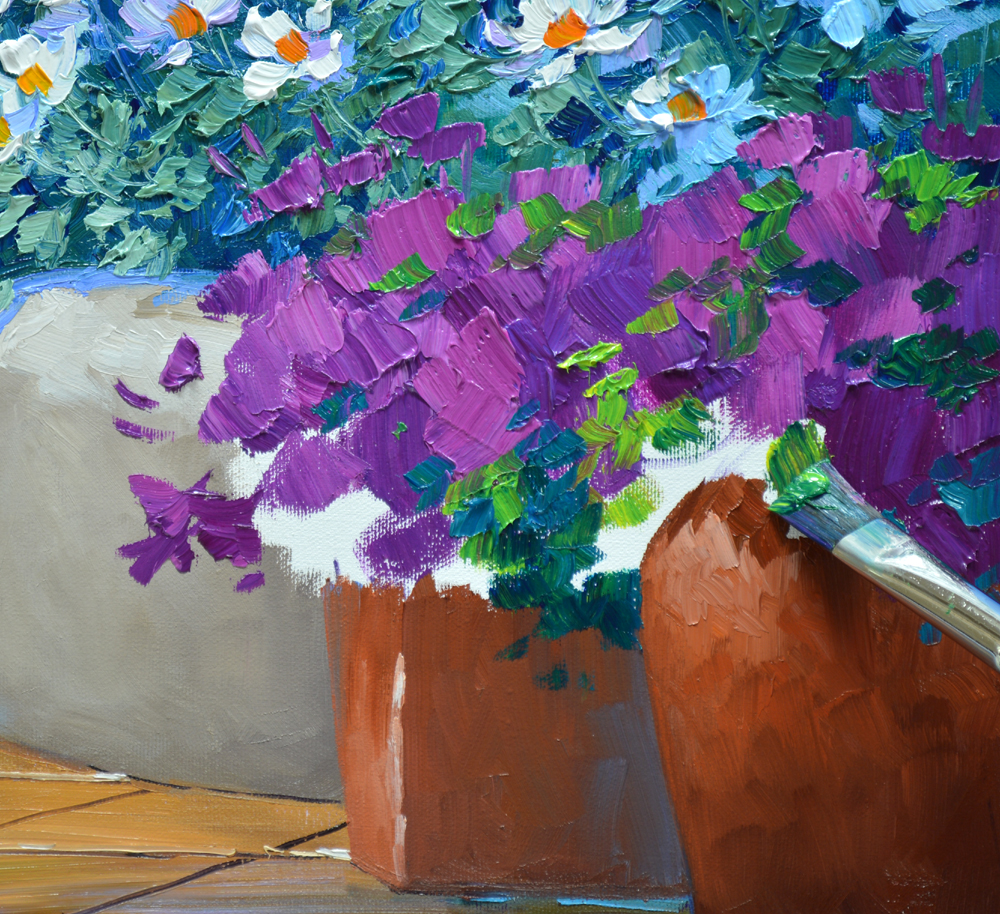
Dark stripes are drawn into the wet paint of “Kitty’s” fur. Than I move to the flower pots, planting Petunias and Geraniums. The plants are painted in my usual sequence: Flowers First, Leaves Last.

SA0314 Takin' a Sunbath 14x14 closeup

I have to admit, I instantly fell in love with this cat in Villefranche. The way he nestled at the base of the flower pots enjoying the warmth of the sun heated tiles captured my heart. Jack and I call the sweet tabby cat “Kitty” but the winner of Takin’ a Sunbath also gets the official naming rights for the little baby.

SA0314 Takin' a Sunbath 14x14Takin’ a Sunbath     14″ x 14″    Original Oil Painting

This little cutie needs a home. He doesn’t eat very much at all and is very quiet. Perhaps a special cat lover in your life has a birthday coming up. Or Valentine’s is right around the corner. Senkarik Original Paintings make unique gifts that are sure to please.

SA0314 Takin' a Sunbath 14x14 with tape

Takin’ a Sunbath measures 14″ x 14″. And don’t worry about doing any framing, the sides of the gallery wrap canvas are finished, ready for you to hang on your wall. We even provide the hanger and nail!

This size original oil painting retails in our galleries for $690 but to make it more fun we’ve started the bidding at 1 cent. That’s right, ONLY A PENNY! But don’t linger, the auction ends tomorrow Sunday, January 19 at 8 PM Texas (Central) Time.

CLICK HERE to go directly to my eBay auction for Takin’ a Sunbath.

HAPPY BIDDING,

Mikki Senkarik signature JPEG

A Legacy of Aloha

January 17, 2014

SA0414 A Legacy of Aloha step 18

One of Paul’s non-negotible requests was a Hummingbird. Now, before you quickly tell me there are no hummingbirds in Hawaii I want to let you in on a little secret. Scarlett and Rhett have decided to spend the winter in Hawaii instead of Mexico!

SA0414 A Legacy of Aloha step 20

My all time, absolute favorite book in high school was Gone With the Wind. Many happy hours were spent lost in the story of Tara and the south. I felt as if I’d lost a friend when the last page was turned. So I just went back to the front of the book and began reading again! Scarlet and Rhett seemed to be the perfect names for our little, well-traveled Ruby-Throated Hummingbirds.

SA0414 A Legacy of Aloha step 21

Sea Grapes line many of the beaches in Hawaii. They have tough, leathery leaves that roll down the sand like a frisbee on edge when the ocean breeze picks up.

SA0414 A Legacy of Aloha step 22

The grey-green leaves of the Birds of Paradise are made by combining Pthalo Blue + Cadmium Orange + White in different proportions. This is another plant that I paint the foliage before the flowers. The brush strokes of the orange blooms on the “Heads” are pulled upward. That way the ends of the petals softly feather out into the wet paint of the background. To see this better just click on the image to enlarge the picture.

SA0414 A Legacy of Aloha 30x24

A Legacy of Aloha    30″ x 24″    Original Oil Painting

The Birds of Paradise have all turned to look down their long beaks at the unexpected visitors. I plant some Red Anthurium to fill the lower right corner, sign the piece and we’re done. A Legacy of Aloha is ready to bring the warmth of Hawaii to Diana’s new office in New York. Scarlett and Rhett are excited about their new home in NYC overlooking Times Square. They’ve never been there. We might have to go visit them at New Years! Thank you so much for following my blog. Have a wonderful day. Hugs,

Mikki Senkarik signature JPEG