Archive for April, 2016

Breakfast for Two

April 28, 2016


VIDEO! Painting the Philodendrons.

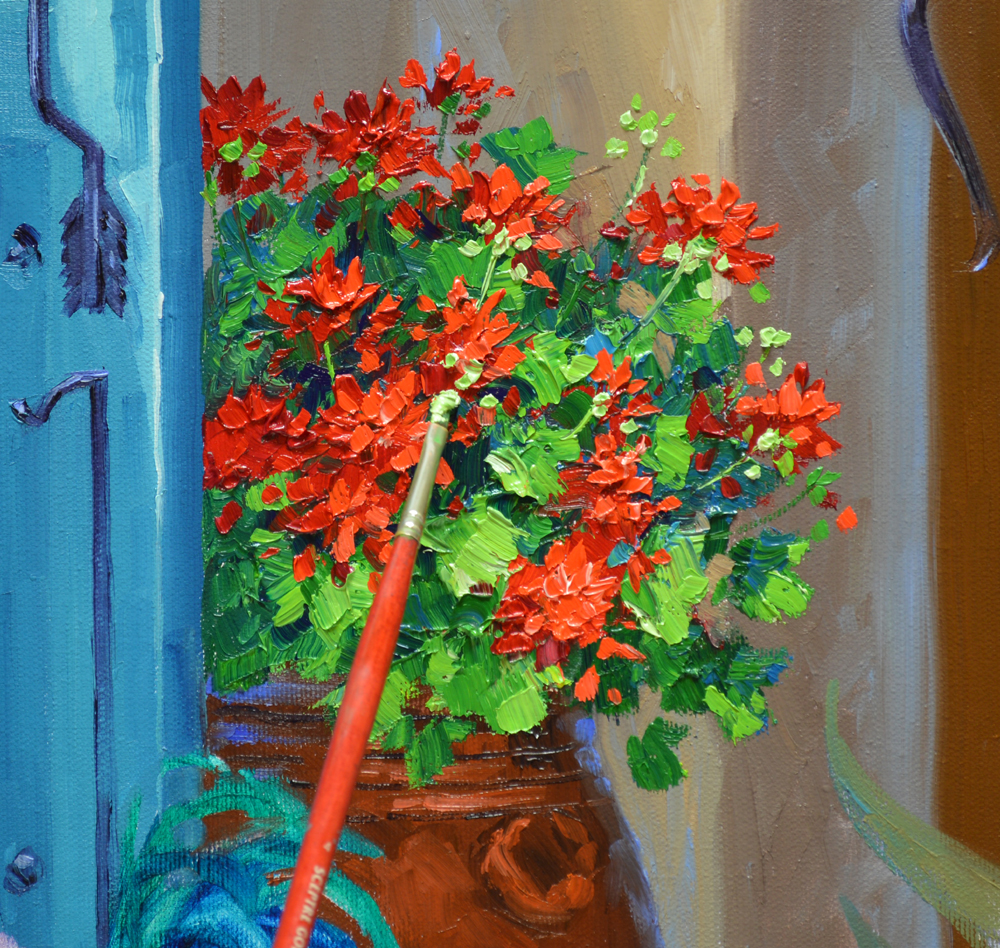
VIDEO! Blocking in the Geraniums following my usual sequence, Flowers First, Leaves Last.

VIDEO! Adding the final touches to the Geraniums.

SD1216 Step 36

The Red Geraniums offer a nice contrast juxtaposed by the white shutters and yellow walls.

SD1216 Step 37

My colors are mixed for the White Daisies in the lower left corner. The recipes are as follows…..#1. White + Ultramarine Blue. #2. Two shades of White + Dioxazine Purple. #3. White + Pthalo Blue. #4. Pure White. #5. White + Pthalo Blue + Lemon Yellow. #6. Three mixes in different proportions of Pthalo Blue + Cadmium Yellow Medium + White. #7. Pthalo Blue + White.

SD1216 Step 38

The shadow colors of the white flowers are blocked in first with mixes #1, #2 and #3. Please remember, you can click on any of the pictures to see them larger.

SD1216 Step 39

Next the foliage is painted. I work the greens around the masses of white, giving shape to the flowers.

SD1216 Step 40

One of the most fun parts of painting Daisies is adding the centers and crisp White highlights. Instantly the flowers seem to come alive, dancing and bobbing in the breeze!

SD1216 Step 41

Lilies are another of my favorites. The yellow mass was painted with mixes of Cadmium Yellow Medium + Cadmium Orange + a touch of MUD (Ultramarine Blue + Alizarin Crimson), Cadmium Yellow Medium + Cadmium Orange and Cadmium Yellow Medium + Lemon Yellow. The leaves are made with greens left over from the White Daisies. I just added a bit of Lemon Yellow to all of the mixes.

SD1216 Step 42

The deep centers are indicated with a combination of Magenta + Liquin.

SD1216 Step 43

The same greens are used for the broad leaves of the Canna Lilies.

SD1216 Step 44

Magenta + Dioxazine Purple Petunias are planted in the terra cotta pot next to the Lilies. Since they are complimentary colors, Yellow and Purple, each appears brighter.

SD1216 Breakfast for Two 24x30Breakfast for Two         24 inches tall by 30 inches wide

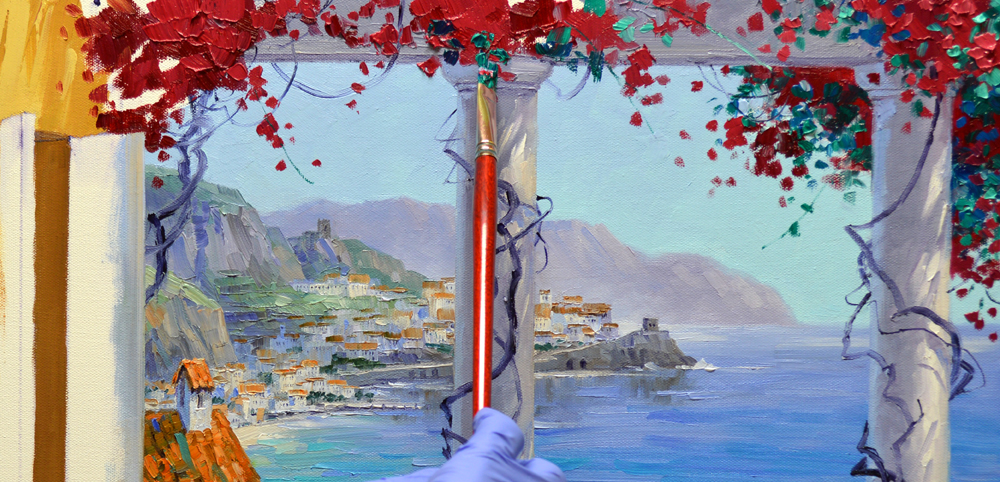
Silver Ponyfoot Vine spills out from the Petunia container. AND…..we’re finished! The sun dappled terrace overlooking the Amalfi Coast provides a delightful spot for an enchanting Breakfast for Two. It’s been fun having you visit our studio to follow my painting process; hope you’ll come back soon. BIG HUGS,

Mikki Senkarik signature JPEG

http://www.senkarik.com

Fresh Fruit and Wicker Chairs

April 25, 2016

SD1216 Step 30

Now…..let’s get to the fruit basket by the vase of Roses. The red grapes were first blocked in with thin mixes of Alizarin Crimson + Liquin. Next work begins on the bananas. Please remember as you go through my blog, you may enlarge the images by clicking on them.

SD1216 Step 31

Adding highlights and the reflected light along the lower edge of the individual grapes makes them appear round.

SD1216 Step 32

Moving to the wicker chairs the dappled light pattern on the back is established first.

SD1216 Step 33

I come back with a small Bright (square) brush and use thick brushstrokes in a lighter value to indicate the texture of the woven wicker.

SD1216 Step 34

“Painting Forward” I begin blocking in the fresh white tablecloth that drapes over the Bistro table.

SD1216 Step 35

Thick, fluffy Ultramarine Blue cushions issue an invitation to plop down in the wicker chairs. The combination of Blue and Yellow looks so happy. I’m really glad Stan and Lonnie changed from the wrought iron chairs to the wicker. They look so crisp with the yellow building and white shutters. We’ll be planting in our next session. Grab your gardening gloves and come help! BIG HUGS,

Mikki Senkarik signature JPEG

http://www.senkarik.com


Romantic Roses

April 24, 2016

SD1216 Step 26

Stan asked me to put a vase of Roses on the bistro table especially for Lonnie. Isn’t that romantic? I begin blocking in the pink blossoms with several shades of Permanent Rose + White.

SD1216 Step 27

Palm Fronds add a different texture to the happy bouquet. I start to delineate the details of the flowers with a small Bright brush. Want to know more about the brushes I use? Just CLICK HERE!

SD1216 Step 28

Breathe in deeply. Can’t you just smell the wonderful fragrance of the freshly picked Roses? To see the picture enlarged just click on the image.

VIDEO! Starting to paint the Italian Tile floor. First I cover the surface entirely, establishing the dappled light and shadow pattern.

VIDEO! The perspective lines are drawn into the wet paint of the floor with a fine liner brush dipped in a mix of MUD (Ultramarine Blue + Alizarin Crimson) + Liquin. This is done freehand, using a mahl stick would limit the movement of my hand making it difficult to pull a straight line. Then the horizontal lines separating the tiles are made.

SD1216 Step 29

That’s all folks! Thank you for all of your kind comments and questions. You don’t know how much I appreciate them. Hope you’ll come back soon. We’ll be working on the fruit basket, table and wicker chairs in the next session. BIG HUGS,

Mikki Senkarik signature JPEG

http://www.senkarik.com


Wispy Wisteria and Sun Dappled Shutters

April 22, 2016


VIDEO! Painting the Wispy Wisteria draping over the yellow wall. The lovely lavender is made of several mixes in different proportions of Dioxazine Purple + Ultramarine Blue + White. The lacy leaves are made with mixtures of Viridian + Cadmium Yellow Medium. I follow my usual sequence of Flowers First, Leaves Last!

SD1216 Step 20

After finishing the Wisteria I move to the tall, sun dappled shutters. The shadows are painted first.

SD1216 Step 21

Then the sunny portions are dragged over the shadows with pure White. This softens the edges of the sun streaks.

SD1216 Step 22

The upright edges of the shutter panels are drawn with a thin mix of MUD (Ultramarine Blue + Alizarin Crimson) + Liquin.

SD1216 Step 23

Next the horizontal lines of the shutters are drawn. I brace the fingers of my left hand against the unpainted portion of the canvas. I rest my right hand on my left wrist to steady it as I delineate the individual louvers.

SD1216 Step 24

Since the louvers sit at an angle there is a triangular space at the end of each one. In this case I use the mahl stick to steady my painting hand as I draw them.

SD1216 Step 25

We’re moving right along…..Thank you for following my blog. Hope you’ll come back soon! BIG HUGS,

Mikki Senkarik signature JPEG

http://www.senkarik.com


The Terrace Pergola

April 20, 2016

SD1216 Step 13

The whitewashed buildings just below the terrace are now painted. For the sunlit portion of the stucco I use a cool White made of White + a tiny bit of Ultramarine Blue. This will make the buildings drop into the distance. I’ll use a warmer mix of White for the part of the terrace shutters illuminated by the sun. My wrist is braced against the mahl stick to steady my hand as I delineate the details of the Severs Green + White window frame and shutters.

SD1216 Step 14

The columns supporting the Pergola are painted with several shades of warm White. Mixes of White + MUD (Ultramarine Blue + Alizarin Crimson) + a teeny touch of Cadmium Orange in different proportions are used. Pure White + a little Ultramarine Blue + a bit of Cadmium Orange is used for the filtered light streaking down the round column.

SD1216 Step 15

It’s fun dragging the lacy shadows of the Bougainvillea across the yellow wall. Two shades of Cadmium Yellow Medium + MUD + a little Cadmium Orange + White are used for the building.

SD1216 Step 16

Here are my color recipes for the Bougainvillea. #1. Alizarin Crimson + Magenta + White. #2. Magenta + a tiny bit of White. #3. Alizarin Crimson + White. #4. Two shades of Viridian Green + White. #5. Pthalo Blue + White.

SD1216 Step 17

The colorful bracts of the Bougainvillea are blocked in first with a large Bright (Square) brush.

SD1216 Step 18

The foliage is painted around the masses of Red, helping to shape the flowers. You can click on the image to see it larger 🙂

SD1216 Step 19

The Bougainvillea cascades over the pergola, the rays of sun drifting through its long arms will bathe the terrace in filtered light. The trunk of the Wisteria on the left side is added and we’re done for today. Hope you’ll come back and watch the next session. I hope to have a VIDEO for you! BIG HUGS,

Mikki Senkarik signature JPEG

http://www.senkarik.com

Painting Amalfi

April 18, 2016

SD1216 Step 7

Let’s get painting! Here are my color recipes. #1. Ultramarine Blue + White. #2. Ultramarine Blue + a tiny bit of MUD (Ultramarine Blue + Alizarin Crimson) + White. #3. Mix #2 + a little touch of Pthalo Blue + White. #4. Two shades of MUD + Ultramarine Blue + White. #5. Cobalt Blue + White. #6. Pthalo Blue + White. Why do we call MUD, MUD? CLICK HERE to find out and learn more about our double primary mixing system.

VIDEO! I start with the sky because it is the source of light for the piece. When it is complete I “PAINT FORWARD” beginning with the farthest bluffs.

VIDEO! Work on the background continues.

VIDEO!  Adding some of the details on the delightful coastal village.

SD1216 Step 8

Reflections of the old fort on the rocky outcropping are dragged straight down into the water below.

SD1216 Step 9

Then a few horizontal brushstrokes are made across the reflections. This gives the feeling of waves moving in to crash against the shoreline.

SD1216 Step 10

I follow a simple rule in painting the ocean: Muted colors go back, Intense or bright colors come forward. The Mediterranean water is made duller in the distance. Mixes of Ultramarine Blue + MUD + White are used. Moving to the middle ground slightly darker mixtures of Ultramarine Blue + White and Ultramarine Blue + Pthalo Blue + White are used. The closest water is Pthalo Blue + White making it very intense. This helps to give the feeling of depth in the piece. The shallow water nearest the beach is made a bit greener. The creamy yellow sand influences the blue water over it, making it appear more green!

SD1216 Step 12

The view from the terrace is complete! Thanks for following along today. BIG HUGS,

Mikki Senkarik signature JPEG

http://www.senkarik.com

From the Desert to the Mediterranean

April 17, 2016

SD1216 Step 1 Painting Setup

My next painting takes us from the Sonoran Desert in Arizona to a terrace overlooking the Mediterranean. Thought you’d like to see my painting setup. The overhead light is a standard 4 bulb unit from Home Depot. We use daylight fluorescent bulbs to provide consistent painting light. A large garbage bag is placed over an aluminum walker for my paint tissue. The palette is glass laid on top of a white board placed on a culinary cart, the shelves are perfect for keeping my paint and extra supplies close at hand. The taboret is a smaller kitchen cart. Jack’s painting over the mantle is called Peace in the Valley. It is one of my favorites. If you’d like to enlarge the image in order to see my painting setup more clearly just CLICK on the picture.

SD1216 Step 2 kitchen painting sample

My collectors saw this painting by Julian Askins and requested that I do something similar. They especially like the filtered shadows on the building, floor and table.

SD1216 Step 3

The sketching process begins by establishing the perspective of the double doors and columns supporting the pergola. Then I draw some of the plants with a brush dipped in a thin oil wash made of MUD (Ultramarine Blue + Alizarin Crimson) + Liquin. This piece is framed in my White Senkarik Signature Frame. The frame is made of a heavy body acrylic from England that we apply to a gallery wrap canvas. It is then wrapped for protection and the painting area taped off.

SD1216 Step 4

The Bougainvillea is drawn, then work begins on spacing the balusters in the railing.

SD1216 Step 5

We decided the terrace should overlook the Amalfi Coast. I don’t mind that at all, Jack and I LOVE the Amalfi Coast and have wonderful memories of traveling there. I’ve changed the chairs from white wicker to wrought iron with heart-shaped backs to bring an extra touch of romance to the painting.

SD1216 Step 6 - completed sketch

A basket of fruit and vase of Roses are placed on the table. The flowers are all labeled, I have a tendency to get into painting and forget my original plan 🙂 If you would like to receive an email every time I publish a new post you can subscribe to my blog. CLICK THIS LINK and scroll to the upper right side of the page. You will see a heading EMAIL SUBSCRIPTIONS. Just enter your email address and click the button “Sign me up!”  It’s easy. And if you enjoy my blog please CLICK the FaceBook LIKE Button. As we say in Texas, “Much Obliged!

Mikki Senkarik signature JPEG

http://www.senkarik.com


A Walk Through Our Garden…

April 15, 2016

2016-4-14 Back Yard

Let’s take a little break from painting and walk though our garden. It is incredibly beautiful right now, this is in the back yard. Remember, you can click on this or any of the other images to see them larger.

2016-4-14 Snoopy Garden 1

The purple tree is a Forest Pansy Redbud, her name is Ruby. Rosie, a Texas Redbud, is on the left. Both were covered in deep pink blooms in early March. Dear friends gave us the Snoopy birdhouse!

2016-4-14 Tomatoes

TOMATOES! Jack is already dreaming about devouring fresh Celebrities this summer.

2016-4-14 Sissie and Rose Arbor

Sissie, one of our rescue kitties, also has her eye on the Tomatoes. The arbor behind her is covered with Peggy Martin Roses. They were discovered in the Ninth Ward in New Orleans after Hurricane Katrina. The tough rose had survived being submerged under salt water for over a week. Commercial growers decided to propagate them for retail nurseries. We love these, especially since they have NO THORNS!

2016-4-14 Rose Arbor Fountain Courtyard 2

The path under the arbor leads up to our Fountain Courtyard.

2016-4-14 Fountain Courtyard 1

Here’s the view from the other end of the Fountain Courtyard. The wall behind the fountain is covered with Star, or Confederate, Jasmine. It’s just beginning to bloom and the fragrance is wonderful.

2016-4-14 Sissie on Railing

Sissie loves to stretch out on the deck railing and soak up the sun.

2016-4-10 Poppies along street 1

Last September we seeded this area with Red Corn Poppys and BlueBonnets. Now we are reaping the visual rewards! That’s some of the Confederate Jasmine popping over the fence. Our neighbors can enjoy the fragrance as they walk to get their mail.

2016-3-20 Rock Purslane 1

Rock Purslane blooms along the front walkway.

2016-3-21 Iris 3

And my Irises are showing off their bearded glory.

2016-4-14 Amaryllis

At Christmas we always have Amaryllis in the house as part of our decorations. After they bloom I plant them in the garden. The second spring they begin producing blooms outside. So each year we get more and more of these gorgeous flowers inside and out!

2016-4-14 Kitchen Garden 1

Last, but not least, the Peggy Martin Roses are putting on a show in our kitchen garden. Those are African Daisies in the blue containers. Jerusalem Sage is just beginning to burst out in yellow blooms at the far left of the picture. NOW…..if you’d like to see how it looked when we moved in almost two years ago, as well as some transitional pictures, CLICK HERE.   Thank you for joining me in the garden today. We’ll be back at the easel in our next session. HUGS,

Mikki Senkarik signature JPEG

http://www.senkarik.com


Refuge of Tranquility

April 12, 2016

SD1116 Refuge of Tranquility Step 48

The Sunflowers are started following the same sequence as the other flowers. The cheery blossoms are blocked in first with mixtures of Cadmium Yellow Medium + Cadmium Orange + MUD and Cadmium Yellow Medium. A large Bright (Square) brush is used to “smoosh” the colors together on the canvas.

SD1116 Refuge of Tranquility Step 49

After the warm green leaves are painted I go back in and make the large dark centers in the blossoms. Isn’t it amazing how the yellow blogs immediately look like Sunflowers!

SD1116 Refuge of Tranquility Step 50

The petals are added to finish out the Sunflowers. A mix of Cadmium Yellow Medium + Lemon Yellow is used to highlight those blooms that catch the sunlight.

SD1116 Refuge of Tranquility Step 51

My signature, made with Cadmium Red Light, stands out on the deep green of the leaves. You can see how the Sunflowers continue around the side of the canvas. If you would like to enlarge the image just click on the picture.

VIDEO! Painting the feisty little Rooster that lives in the courtyard.

VIDEO! Part Two of working on the Rooster. Notice how I brace the fingers of my left hand against the unpainted portion of the agave. Bracing my right wrist against the left steadies my hand as I delineate the details on the spirited little fella.

SD1116 Refuge of Tranquility Step 52

Deep purple Lavender fills the foreground planter at the base of the Agave. The rich color of the spiky flowers is made with different combinations of Dioxazine Purple + Magenta + White.

2013-6-1 Cactus garden end of drive 1

I love Agave. The great grandparents of these are in Carefree, Arizona where we lived several years ago. We’ve planted offspring from those at every home we’ve lived in since. These at our previous home in the Texas Hill Country make wonderful models for our painting today.

SD1116 Refuge of Tranquility Step 53

The soft gray-greens are made from several combinations of Pthalo Blue + Cadmium Orange + MUD + White.

2016-2-17 African Daisies

Cherry Frost African Daisies are in the courtyard at our current home. I decided to plant some in the large blue ceramic container in John and Linda’s painting.

SD1116 Refuge of Tranquility Step 54

The blossoms are blocked in with mixtures of Cadmium Red Light + Permanent Rose, Cadmium Red Light + White, Permanent Rose + Cadmium Red Light + White.

SD1116 Refuge of Tranquility 42x34Refuge of Tranquility              42 inches tall x 34 inches wide

Soft green leaves accentuate the fiery African Daisies. We’re finished! Our colorful Rooster happily parades around his Refuge of Tranquility. I just hope he doesn’t wake John and Linda with his joyful crows in the morning! Thank you so much for following along! BIG HUGS,

Mikki Senkarik signature JPEG

http://www.senkarik.com


Red, Green and Yellow Chilis

April 11, 2016


VIDEO! Painting the tri-colored chili ristra.

SD1116 Refuge of Tranquility Step 40

The multicolored chilis will add a spicy touch to John and Linda’s southwest kitchen.

SD1116 Refuge of Tranquility Step 41

I follow my usual order to block in the Geraniums: Flowers First, Leaves Last. The red blossoms are mixtures of Alizarin Crimson + Magenta and Alizarin Crimson + Cadmium Red Light. You can click on the image to see it enlarged.

SD1116 Refuge of Tranquility Step 42

The individual petals of the Geranium blooms are highlighted with pure Cadmium Red Light.

SD1116 Refuge of Tranquility Step 43

The final step is to add the buds that cluster on the Geranium blossoms.

SD1116 Refuge of Tranquility Step 45

We’ll move to the White Hollyhocks growing on the left of the gate. The blossoms have been blocked in with combinations of White + Ultramarine Blue, White + Dioxazine Purple and White + Pthalo Blue. These darker hues will provide the shadows of the White flowers. Foliage is painted with mixes in several different proportions of Pthalo Blue + Lemon Yellow.

SD1116 Refuge of Tranquility Step 46

The deep, dark centers of the large, lacy Hollyhock blooms are drawn with a brush dipped in a mix of Magenta + Liquin.

SD1116 Refuge of Tranquility Step 47

Pure White highlights glow on the Hollies illuminated by the sun pouring over the courtyard wall. We should be finishing up in our next session. AND….just a little tease, make sure to come watch the little Rooster spring to life! Also I just want to say Thank you again for all of your prayers, wonderful comments and well wishes for Jack. He is happy as can be, clacking away on the computer writing his new book. BIG HUGS,

Mikki Senkarik signature JPEG

http://www.senkarik.com