Archive for January, 2017

Garden Patrol

January 30, 2017

sa0517-step-31

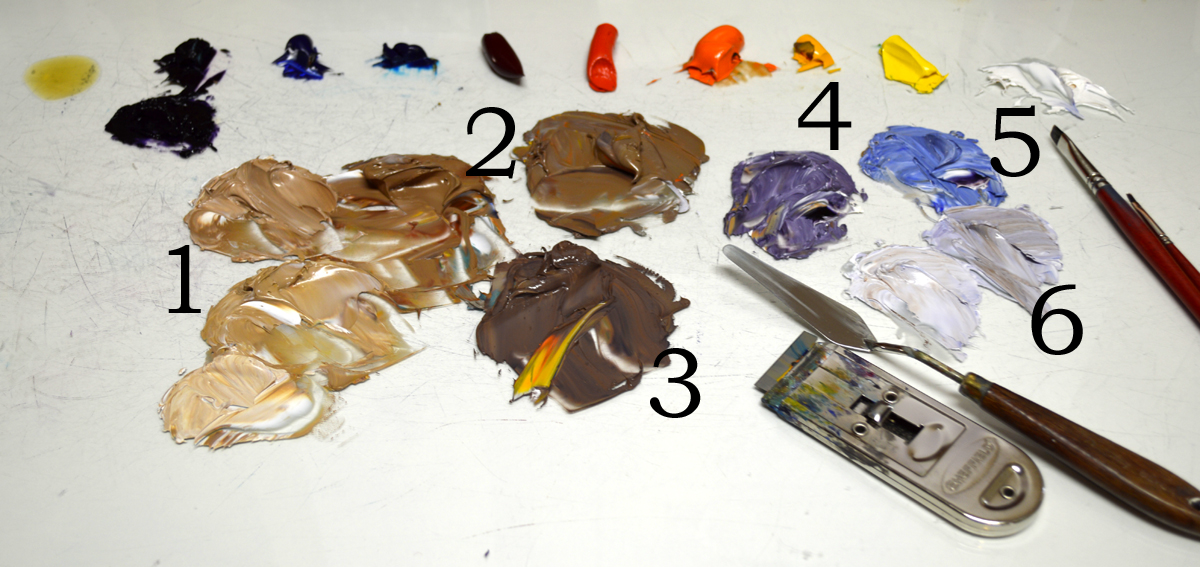
SUNFLOWERS! Another of my favorites. The large blossoms are blocked in with mixes of Cadmium Yellow Medium + Alizarin Crimson, Cadmium Yellow Medium + a touch of MUD (Ultramarine Blue + Alizarin Crimson) and pure Cadmium Yellow Medium.

sa0517-step-32

After broad leaves are painted and centers added I come back to delineate the individual flower petals illuminated by the warm sunshine.

sa0517-step-33

Sweet Potato Vine cascades from the planter at the entry. Heart shaped shadows cast by the leaves bring a subtle touch of romance to our painting.

sa0517-step-34

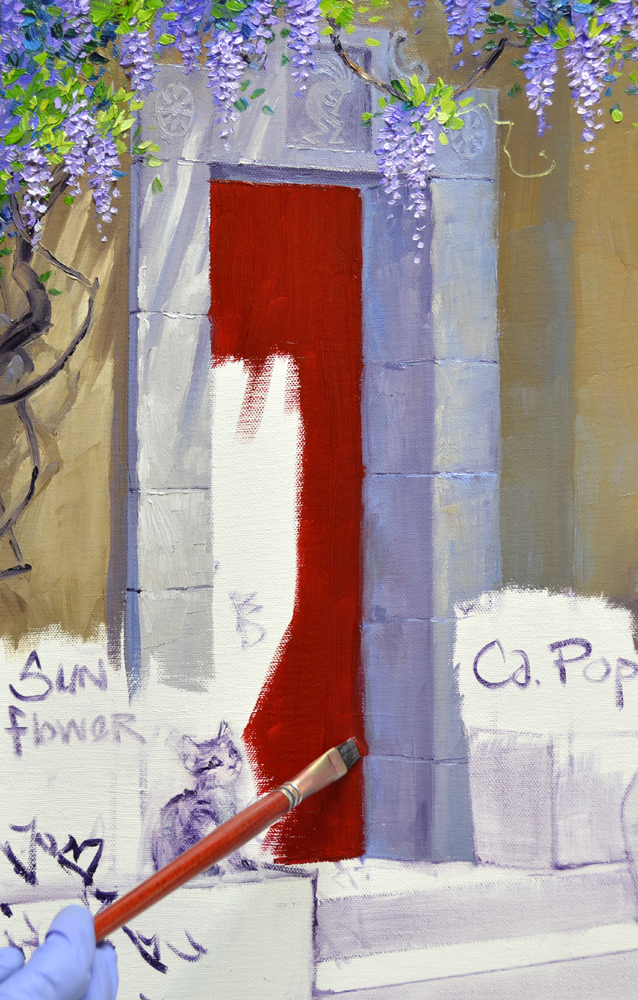
The kitty on the window sill is painted with mixes of Ivory Black + White. Highlights of Ultramarine Blue + White shine on his glossy coat. You may click on the picture to see it larger.

sa0517-step-35

Swishing his tail, he’s about ready to leap from his perch by the blue ceramic container.

sa0517-step-36

A pretty little tiger kitten snuggles into the Sweet Potato Vine. She’s intently watching…….

sa0517-garden-patrol-20x24Garden Patrol   20 inches tall by 24 inches wide

A Butterfly! Nothing gets past these two. Butterflies and lizards BEWARE! The Garden Patrol is ready to protect their territory from any dangerous invaders. It’s been fun having you follow along. Many have asked how I’m doing. Better, thank you. Painting has been a God send. It’s a special connection to Jack and gives me great joy. Our Lord has blessed me with so many wonderful, caring friends like all of you who care. I sincerely appreciate your concern. You are my internet family, helping me discover my new path! HUGS,


Poppies and Day Lilies

January 28, 2017

sa0517-step-26

California Poppies are some of Jack’s and my favorites. In a good spring they carpet the rolling hillsides in Southern California and the floor of the Sonoran Desert. The colorful blooms are blocked in with mixes of Cadmium Red Light + Alizarin Crimson, Cadmium Orange + Alizarin Crimson, Cadmium Orange and Permanent Rose + White.

sa0517-step-27

The dusty green foliage is made with several combinations of Pthalo Blue + Cadmium Orange + White.

sa0517-step-28

After adding the deep centers with Magenta + Liquin I let a few petals float to the courtyard floor. If you’d like to see this or any of the other pictures larger just click on the image.

sa0517-step-29

Day Lilies are some of the few flowers I DON’T paint in my usual sequence of Flowers First, Leaves Last. I’ve blocked in the long, strap-like leaves to begin, then the blossoms are added. The thick brushstrokes are  gently “Laid” on top of the underlying color. This is so my brush won’t pick up any of the paint underneath, muddying the bright hues of the blooms.

sa0517-step-30

That completes today’s session. I’ll be working on the Sunflowers and Kitties next, hope you’ll come watch! HUGS,

Painting Daisies (as well as the Floor!)

January 25, 2017

sa0517-step-19

All of the pots are painted with various combinations of Ultramarine Blue + Pthalo Blue + White. A little Viridian Green is added into some of the mixtures to bring a bit of variety to the blues.

sa0517-step-20

The entire surface of the floor is covered with the light and shadow pattern. Using a large Bright (Square) brush enables me to apply the paint with lots of texture. Remember as you read through my blog, you may click on any of the pictures to see them larger.

sa0517-step-21

Today we are laying rough, uneven pavers. First the perspective lines parallel to the window wall are made. They are pulled into the thick paint with a fine liner brush.

sa0517-step-22

Next the crevices following the door wall are made.

sa0517-step-23

Having the canvas attached to cardboard makes it easier to handle. The entire unit is placed on my taboret in order to continue the pavers over the edge to the bottom surface of the canvas.

sa0517-step-24

The uneven pavers are highlighted where the light catches the raised, rough edges.

VIDEO! Painting the Daisies PART I. First of all, please excuse that the window looks so out of perspective. It’s just the camera angle! I had to place the camera to the side of my easel so my hand wouldn’t cover over what I was painting. The flower pots are NOT going to fall off of the window sill! The Daisies are blocked in following my usual sequence of FLOWERS FIRST, LEAVES LAST.

VIDEO! Painting the Daisies PART II. The petals of the blossoms, centers and stems of the White Daisies are delineated in this step.

sa0517-step-25

Daisies are such a happy flower. I can envision their blossoms dancing and bobbing in a gentle breeze floating through the entry garden. That’s our lesson for today, hope you’ll come back soon! HUGS,

The Wandering Wisteria

January 23, 2017

sa0517-step-12

Our color recipes for the Wisteria are #1. Three mixes in different proportions of Ultramarine Blue + Dioxazine Purple + White. #2. Two shades of White + Dioxazine Purple. #3. Pthalo Blue + Liquin. #4. Three mixtures of Viridian Green + Cadmium Yellow Medium.

sa0517-step-13

Even with my easel cranked down to the lowest level I still have to stand on a step stool to paint the top edge of the gallery wrapped canvas. The 20″ x 24″ painting is attached to a sheet of double ply cardboard. To see how this is done, CLICK HERE. Molly, my supervisor, is asleep on the job over on the taboret. If you’d like to enlarge the picture just click on the image.

sa0517-step-14

We’re going to let the Wisteria wander all across the top of the painting. The purple blooms are blocked in first with mixes #1 and #2. Then I come back and paint the leaves around the masses of purple, using the greens to shape the long, dangling flowers. Mixture #3 is worked in, here and there, to bring depth and coolness to the foliage.


sa0517-step-15

Individual flower petals are now delineated using a #4 Bright (square) brush. You can see how the painted image extends over, on to the side of the gallery wrap canvas.

sa0517-step-17

I want the stone surrounds to appear old and weathered. As I’m painting the red door irregular indentations are made at the junctions of the large blocks to give them an aged look.

sa0517-step-18

The sunlit portion of the door is painted with pure Cadmium Red Light. It’s fun pulling the shadows of the Wisteria vine and blossoms into the wet paint. The red in the shadow is a mix of Cadmium Red Deep + Alizarin Crimson. The same mixture is used for the window. So….that’s all for today, hope you’ll come visit again soon. HUGS,


Adobe and Stone

January 21, 2017


sa0517-step-6

We’ll begin work by “constructing” the adobe walls. My mixes are shown above. #1. Three shades of White + MUD (Ultramarine Blue + Alizarin Crimson) + Cadmium Orange + a little more Ultramarine Blue. #2. Two mixtures of MUD + Cadmium Orange + Ultramarine Blue + White. #3. Mix #2 with more MUD mixed in. #4. MUD + a bit of mix 3 + White. #5. Ultramarine Blue + a touch of Cadmium Orange + White. #6. A couple of mixes of #4 + additional White. 


sa0517-step-7

In the corner of the building a little of the #5 mix is added at the back of the darker, door wall. The coolness of the blue makes the wall recede. Near the window sill I work carefully around my sketch of the kitten, I’ll come back and paint him later. If you’d like to see the picture larger just click on the image.

sa0517-step-8

Even though my reference photo had dark stone around the window I want a more airy look. So I change the surrounds to a lighter rock, using mixes #4, #5 and #6. This is the fun of painting, we are in total control! We don’t have to follow our reference material exactly.

sa0517-step-9

It’s fun developing the details of the lintel. My left hand is braced against the unpainted door to steady my right as I delineate the doodads.

sa0517-step-10

Medallions are painted with a lighter mix into the wet paint of the lintel. This makes them appear embossed.

sa0517-step-11

Since this piece is going to Arizona I’be painted a Kokopelli, a popular Southwestern symbol, in the space over the door. Our adobe and stone work is DONE! But……..

Before I let you go I have to share this video. Sit down, enjoy and take a laugh break. Make sure to listen closely at the beginning! Jack would have been appalled and gotten as far away from me as possible. WHY???? I would have danced….immediately! You just might want to also! A Huge THANKS to The Piano Guys! HUGS,

An Interesting Window

January 19, 2017

window-1-flipped

Isn’t this a cool window? I’m going to use it as the basis for a painting I’m starting today for Exposures Gallery; they represent my work in Sedona. 

sa0517-step-1

A quick drawing is scribbled on my sketch pad. Even though it’s pretty rough I’ve got my ideas down.

sa0517-step-2

After mulling over the sketch I decide to flip the image. In other words I’m going to have the window on the right side of the painting rather than the left as I indicated in the rough drawing. For some reason the composition feels more comfortable to me this way. I begin by drawing the building and steps in a thin oil wash made of MUD (Ultramarine Blue + Alizarin Crimson) + Liquin. MUD is a deep purple that’s the base color in many of our mixtures. If you’d like to know more about our Double Primary Color Mixing System that Jack developed CLICK HERE.

sa0517-step-3

I really like the unusual window sill. I’m simplifying the base just a little, a lot of it is going to be covered by flowers. 

sa0517-step-4

Everyone liked the kitties in my last commission so much that a couple decided to join us in this piece! Please remember, you may click on any of the pictures to see them larger.

sa0517-step-5

I’ve labeled the flowers so I don’t forget as I paint. Also changed the Bougainvillea to a Wisteria, the purple will look really nice with the red door. We’ll begin painting in our next session, hope you’ll come back. If you would like to receive an email every time I publish a new post please feel free to subscribe to my blog. CLICK THIS LINK and scroll to the upper right side of the page. You will see a heading EMAIL SUBSCRIPTIONS. Just enter your email address and click the button “Sign me up!”  It’s easy. And if you enjoy my blog please CLICK the FaceBook LIKE Button. As we say in Texas, “Much Obliged!


Winter’s Magic

January 16, 2017

sa0317-step-29

Let’s get to that joyful pup! Do you think he likes cavorting through the snow? I can almost hear his excited yips. Please keep in mind, as you read through my blog you may click on the pictures to see them larger.

sa0317-step-30

He’s got the snow flying in every direction. A ray of sun slipping through the snow covered pine illuminates his head and catches the spray of powder.

sa0317-step-31

Turning to the pair of Bays pulling the sleigh, I start with their legs. While the paint is still wet I pull some of the color underneath the horses into the Ivory Black. This gives the impression of the snow being kicked up.

sa0317-step-32

The sleigh is painted with mixes of Cadmium Red Deep + Alizarin Crimson. We have a Navajo Rug thrown over the back of the couch in our studio. Sissie, one of our rescue kitties, curls up there while I paint. I’ve used the design for reference on the wrap keeping the riders warm on this chilly sunset ride! 

sa0317-step-33

The horses are painted with mixes in various combinations of MUD (Ultramarine Blue + Alizarin Crimson) + Cadmium Orange + a little Cadmium Red Light  + White. If you would like to know more about our Double Primary Color Mixing System that Jack developed CLICK HERE.

sa0317-step-34

I love the adornments found on harnesses. We’ve collected pictures of them over the years. I decided to add these heart shaped ones to the brow bands of the horse’s bridles.

sa0317-step-35

“Jingle Bells, Jingle Bells, Jingle All The Way.” It just wouldn’t be a proper sleigh ride without jingle bells!

sa0317-step-37

A few of you mentioned that our driver looked a little like Jack. Well….you are absolutely right. I found a picture of him in just the right pose. He’s modeled for me in several paintings over the years, my hero has always been Cowboy Jack. 

sa0317-winters-magic-20x24Winter’s Magic     20 inches tall x 24 inches wide

Delighted laughs, the jingle of sleigh bells, happy barks, hoof beats in the snow and the chip, chip, chip of a cardinal. All add up to make the music of “Winter’s Magic.” Thank you again for every one of your wonderful comments. You all are the best! Lots of Warm Hugs,


Mr. Chippers

January 14, 2017

sa0317-step-23

The warm and cool rule, “Warm Colors Come Forward, Cool Colors Go Back”, even applies to snow. The snow in the back near the base of the gate and wall is painted with mixes of White + Ultramarine Blue. That closer to the foreground has some MUD (Ultramarine Blue + Alizarin Crimson) added into the blue mixes to make the snow warmer.

sa0317-step-24

A few more “Growies” pop up next to the Chamisa. I imagine that energetic pup will jump right over them.

sa0317-step-25

Light from the lowering sun streams across the snowy road. Again, the area back by the horses is painted cooler. Moving closer to the viewer the highlights become warmer; a tiny, tiny bit of Cadmium Orange is mixed into the White. 

sa0317-step-26

Mr. Chippers has flown from the tree on the left of the painting to nestle among the plants alongside the road. I think he wanted to be a little closer to the action! Foliage is blocked in with warm greens made of Pthalo Blue + Cadmium Yellow Medium + a little Cadmium Orange + White. Blank spots are left where the snow will fall. To see the image larger just click on the picture.

sa0317-step-27

Seed pods remain on the tall stalks of the desert Sage, they are blocked in with a mix of Magenta + White.

VIDEO! Painting Jack’s favorite visitor, Mr. Chippers! He could see the feeder from his desk. Jack would always stop to watch when he’d hear the chip, chip, chip as our pretty boy came to eat. 

sa0317-step-28

The piece is signed while the paint of the snow is still wet. It would be difficult to make my signature smooth if the underlying paint was dry and bumpy. I appreciate you following along today. HUGS,

Pthalo Turquoise Blue

January 13, 2017

sa0317-step-16

The wall along the road is painted with mixtures left over from the distant adobe buildings. I’ve mixed in a little bit of Cadmium Orange and MUD (Ultramarine Blue + Alizarin Crimson) to make the wall darker and warmer.

sa0317-step-17

I do use a few special colors now and then that I just can’t mix with our Double Primary Palette. Today I’ve pulled out some REMBRANDT Pthalo Turquoise Blue for the gate. My wrist rests against the mahl stick to steady my hand as I drag the lines indicating the edges of the individual boards. If you would like to learn more about our Color Mixing System CLICK HERE.

sa0317-step-18

A little of the Pthalo Turquoise Blue reflects down into the snow directly below the gate. Please remember as you read through my blog, you can click on any of the pictures to see them larger.

sa0317-step-19

Chamisa is seen everywhere in the high desert of New Mexico. We’re going to let a big clump grow beside the gate. The foliage is first blocked in with mixes of Cadmium Yellow Medium + a little Cadmium Orange + MUD + White. I’ve also added a little of the gate color into some of the mixes. 

sa0317-step-20

Next some of the foliage is covered with clumps of snow.

sa0317-step-21

The branches of the Chamisa are drawn into the snow with a fine liner brush. This is done wet-into-wet, which makes it much easier to pull smooth lines.

sa0317-step-22

I’d like to take a moment to say THANK YOU for all of your really neat comments. I’ve got the absolute best followers! I’ll be working on finishing the snow in our next session. Hope you’ll come watch! HUGS,

Adobes in the Distance

January 12, 2017


sa0317-step-12

The setting sun illuminates the adobe buildings in the background with a golden glow. Snow on the top of the buildings is made with a light blue, using White with some Ultramarine Blue mixed in. I have to be careful not to make the White too bright, it would jump to the foreground.

sa0317-step-13

Chamisa and sagebrush grow on the hillside below the buildings. The foliage is painted with various combinations of Ultramarine Blue + Cadmium Orange + a touch of Cadmium Yellow Medium + White. The area behind the driver is kept dark, so his light Stetson will stand out.

sa0317-step-14

NOW….for the bright white! The rimlight on the snow capping the adobe wall along the road is made with a mix of White + a tiny bit of Cadmium Orange. Notice how the warmer white causes all of the cool whites in the distance to fall back. You may click on the picture to see it larger.

sa0317-step-15

To make the sunset more dramatic I’ve decided to remove the farthest, snow covered mountain. We see more of the colorful sky and the painting has a feeling of greater depth. That white mountain just drew too much attention. It seemed to call out, “Hey, look at me!” That’s one of the things I love about oil painting, if you don’t like something you can scrape it off with your palette knife and begin again!

VIDEO! When blocking in the snow covered trees the dark areas are painted first, leaving white spots for the fluffy white stuff. After painting the shadows of the snow I come back and add highlights of White + a touch of Ultramarine Blue. These trees are in the middle ground, blue is mixed with the white to make them fall behind the adobe wall. Near the end of the video you see the painting move. My easel is on wheels, making it easy to turn it and the painting to work on the side of the gallery wrap canvas. Thanks for dropping in to our studio today. Please remember, always feel free to ask questions. One of the main reasons I write my blog is to help fellow artists! HUGS