Archive for April, 2014

Welcome to the Southwest

April 29, 2014

SD3914 Welcome to the Southwest Step 10

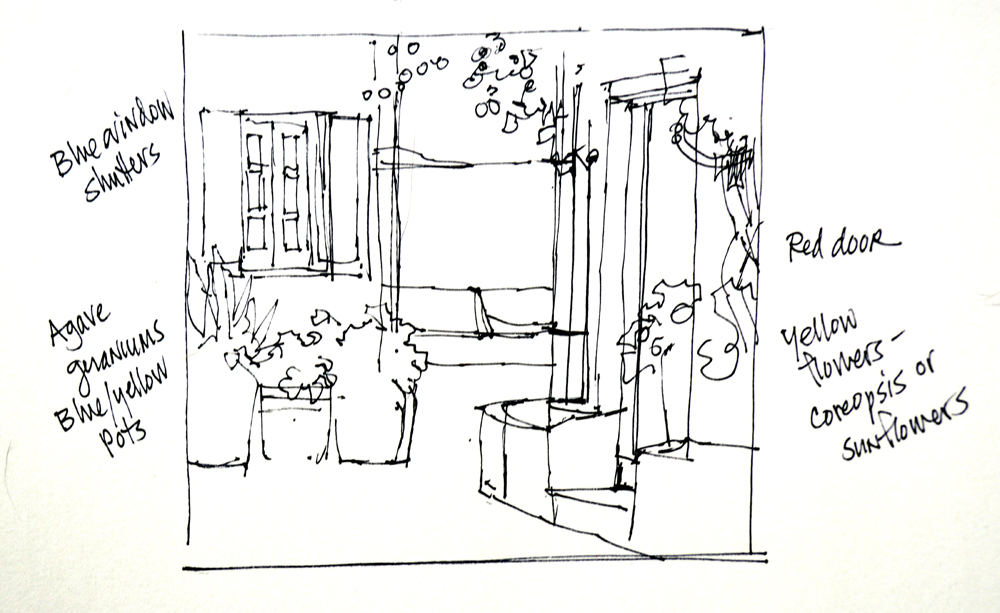
The lovely blue door is painted with light and dark mixtures of Pthalo Blue + Cobalt Blue + White.

SD3914 Welcome to the Southwest Step 11

Mixes of Cadmium Red Light + MUD + Cadmium Orange + White are used for the large Terra-Cotta containers. Then the step up to the door is made. The upright side is darker because less light hits it than the flat surface on the top of the step.

SD3914 Welcome to the Southwest Step 12

Chili Ristras are fun to paint, I like to use lots of texture to give the feeling of the individual peppers. You can click on this or any of the other pictures to see them larger.

SD3914 Welcome to the Southwest Step 13

Perky Petunias fill the containers to the right of the door. Then I begin on the White Daisies. The entire mass  of flowers is blocked in with mixes of Dioxazine Purple + White, Pthalo Blue + White and Ultramarine Blue + White. This jumble of color will provide the shadows for the white blossoms.

SD3914 Welcome to the Southwest Step 14

The leaves are then painted around the flowers, helping to shape them. Mixes in various proportions of Pthalo Blue + Cadmium Yellow Medium are used for the foliage.

SD3914 Welcome to the Southwest 14x11Welcome to the Southwest       14″ x 11″      Original Oil Painting

Bright yellow and orange centers, along with pure white highlights on the petals illuminated by the New Mexico sunshine, finish out the Daises dancing in the breeze. The colorful setting calls out a happy invitation, “Welcome to the Southwest”.  This has been such a delightful project. I want to thank Travis for asking me to make his beautiful photographs into paintings. Have a wonderful day! Hugs,

Mikki Senkarik signature JPEG

Taos Blue

April 28, 2014

SD3914 Welcome to the Southwest Step 5A

This is the second of the photos my collector sent. So I got to work sketching.

Sketch Travis 1 version 2

Originally I had thought Wisteria would look good draping over the top of the building and wall. But after visiting with Travis we decided changing that to Trumpet Vine would tie in nicely with Hands Across Taos. Instead of totally redrawing the sketch I just made a label change. Also the flowers in the container to the left of the door are going to be White Daisies.

SD3914 Welcome to the Southwest Step 6

My plan or “road map” is drawn up on the canvas in a thin oil wash of MUD (Ultramarine Blue + Alizarin Crimson) + Liquin. The Petunias are covered with a transparent layer of Dioxazine Purple + Magenta + Liquin. The Chilis are washed in with Alizarin Crimson + Liquin.

SD3914 Welcome to the Southwest Step 7

After painting the sky I begin blocking in the adobe walls with mixes of various combinations of Cadmium Orange + MUD + Ultramarine Blue + White. More MUD is added into the mixes for the shadows.

SD3914 Welcome to the Southwest Step 8

The Trumpet Vine is painted “Flowers First, Leaves Last”. I usually work in this sequence on most flowering plants. Laying in the bright colors of the blossoms first keeps the paint crisp and clean. If I were to block in the foliage to begin with my brush would pick up some of the greens as I painted the flowers, dirtying their color.

SD3914 Welcome to the Southwest Step 9

Leaves are now added in mixes of Viridian Green + Cadmium Yellow Medium. White is mixed in for the leaves and draping tendrils caught by the sunlight. That’s all for today, hope you’ll come back tomorrow and follow along. Hugs,

Mikki Senkarik signature JPEG


Southwest Hide Away

April 26, 2014

SD4014 Southwest Hide Away 17x20Southwest Hide Away     17″ x 20″    Original Oil Painting

Do you love the Southwest? Or maybe you’ve never been to Santa Fe but have always wanted to go. Escape to your own Southwest Hide Away every time you view this painting on your wall. Take a deep breath, can’t you just feel that fresh mountain air filling your lungs? And the light is so incredibly beautiful in New Mexico, it seems like you can see forever.

 To go directly to my eBay auctions CLICK HERE.

SD4014 Southwest Hide Away 17x20 frame detail

Don’t worry about doing any framing, Southwest Hide Away comes in a Senkarik Signature Frame. We even provide the hanger and nail. Just take it out of the box and hang it on your wall. Mother’s Day is right around the corner. Senkarik Original Oil Paintings make unique presents that are sure to please, bringing smiles for years to come.

SD4014 Southwest Hide Away 17x20 with tape measure

The painted image is 9″ x 12″ while the outside dimension of Southwest Hide Away measures 17″ tall by 20″ wide. This painting would retail in our galleries for $590. But to make it more fun we are starting the bidding on the auction at 1 cent. That’s right, ONLY A PENNY! Please remember, the auction ends Wednesday, April 30 at 8 PM Central Time!

CLICK HERE to go directly to my auctions.

HAPPY BIDDING and HUGS,

Mikki Senkarik signature JPEG


Hands Across Taos

April 22, 2014

SD3814 Hands Across Taos Step 7

The Turquoise Container adds a nice contrast to the white door and orange Trumpet Vine. Next the cobblestone floor is blocked in with various mixes of MUD (Ultramarine Blue + Alizarin Crimson) + Cadmium Orange + White. The portion at the back is made bluer, or cooler, so it will recede. This follows a simple rule that helps give depth in a painting: Cool Colors go Back, Warm Colors come Forward.

SD3814 Hands Across Taos Step 8

The crevices between the individual stones are indicated with a small Bright brush. I don’t want to outline each and every rock, but just give the impression of cobblestones.

SD3814 Hands Across Taos Step 9

Let’s plant some Geraniums in the Turquoise Pot! After the flowers and leaves are blocked in I come back and begin adding the details of the petals.

SD3814 Hands Across Taos Step 10

The Hollyhocks are also painted in my usual sequence of Flowers First, Leaves Last. The bright blossoms are made with combinations of Permanent Rose + White.

SD3814 Hands Across Taos 14x11

Hands Across Taos      14″ x 11″    Original Oil Painting

The greens of the leaves are painted around the pinks, helping to shape the large flowers. Tall stalks filled with seed pods are added and the piece is signed. We’re done! Please remember, if you have any questions feel free to ask. Have a wonderful day. Hugs,

Mikki Senkarik signature JPEG

A Cool Door

April 21, 2014

SD3814 Hands Across Taos Step 1A

My collector took the picture above at the Taos Pueblo in New Mexico. Isn’t this the coolest door? Travis asked if I could paint it with the “Senkarik” touch. NO PROBLEM.

Sketch Travis 2 version 2

Pulling out my sketchbook and Sharpie pen I got to work. Here is the sketch……….

SD3814 Hands Across Taos Step 2

The basic outline is drawn up on the canvas in a thin oil wash of MUD (Ultramarine Blue + Alizarin Crimson) + Liquin. The shadow patterns are also established at this time.

SD3814 Hands Across Taos Step 3

The old adobe wall is painted with mixes of Ultramarine Blue + Cadmium Orange + White. A little MUD is added for the shadows.  The cast shadows of the vigas are made a little cooler, or bluer, at the very ends. If you would like to learn more about our Double Primary Color Mixing System CLICK HERE.

SD3814 Hands Across Taos Step 4

Bracing my wrist on a mahl stick steadies my hand to paint the details of the American Flag hanging inside the window of the door. What is a mahl stick? CLICK HERE to find out!

SD3814 Hands Across Taos Step 5

First the door is painted solid white. Next I come back and delineate the hand prints into the wet paint. What a fun challenge! All the while I was working on this I kept thinking what a great time the people who originally put the prints on the door had.

SD3814 Hands Across Taos Step 6

Stars complete the flag and a Red Orange Trumpet Vine cascades down over the door. Thank you for following along today. Hope you’ll come back and visit again soon. Hugs,

Mikki Senkarik signature JPEG

Preparation for a Southwestern Pair

April 19, 2014

SD3914 Welcome to the Southwest Step 1

Today I’m starting on a pair of paintings based on photos my collector took in Taos, New Mexico. Travis wants his pieces painted on regular canvas to be framed traditionally. So….we have a little preparation work to do before I step up to the easel. A square is made on the back of all my canvases with KILZ paint. This keeps the Sharpie pen I use for labeling from bleeding though the front. Then I write the Title, my copyright info, our code number of authenticity and the personalization for the collector. Two screw eyes are placed in the stretcher bars as shown.

SD3914 Welcome to the Southwest Step 2

The canvas is turned over and placed on a piece of double ply cardboard that is large enough to leave about 3 inches exposed all the way around. Then the canvas is pressed down, the screw eyes dent the cardboard. The ice pick is used to enlarge the dents, making holes all the way through the cardboard. Notice the arrow penciled at the top of the canvas. This is done so the painting will be right side up to the labeling on the back. You may have to enlarge the image to see it better, just click on the picture.


SD3914 Welcome to the Southwest Step 3

The screw eyes protrude out the cardboard, nails are inserted to hold the canvas tightly against the backing. This will allow me to ship the paintings while they are still a bit tacky. I’ll show you how they are packed after the paintings are finished.

SD3914 Welcome to the Southwest Step 4

The cardboard holding the canvas is then placed on my easel. The backing will make handling the wet painting very easy. You can see my painting setup. The easel and taboret are on wheels, its very simple to adjust my work space to accommodate any size painting. That’s Sissie, one of our shelter rescue kitties, on the taboret! She’s supervising today. Have a wonderful evening. Hugs,

Mikki Senkarik signature JPEG

Primary Colors of Mykonos

April 17, 2014

SD3614 Primary Colors of Mykonos Step 1Join me for a ride on my magic carpet to my favorite island in the Greek Islands, Mykonos. I make a quick sketch of this alleyway, winding down to the water, to solidify my ideas.

 CLICK HERE to go directly to my auctions on eBay.

SD3614 Primary Colors of Mykonos Step 2

After painting the sky and lazy summer clouds the crystal clear, azure blue water is blocked in. That in the distance is darker and more muted, the water becomes lighter and brighter in the foreground.

SD3614 Primary Colors of Mykonos Step 3

The red door POPS against the blue green water in the background.

SD3614 Primary Colors of Mykonos Step 4

The entire surface of the typical stone floor is covered with mixes of Cadmium Orange + Ultramarine Blue + White. Then the wide, white grout joints are drawn into the wet paint.

SD3614 Primary Colors of Mykonos Step 5

I fell in love with this combination of Blue and Yellow pots filled with Geraniums the moment I saw them!

SD3614 Primary Colors of Mykonos 10x10Primary Colors of Mykonos      10″ x 10″     Original Oil Painting

Santorini may have spectacular views but this delightful island is filled with loads of happy hues, the Primary Colors of Mykonos. Let the Reds, Yellows and Blues juxtaposed against the brilliant, almost electric blues of the Aegean Sea color your wall with the romance of island living.

SD3614 Primary Colors of Mykonos 10x10 with tape

Primary Colors of Mykonos measures 10″ x 10″ and would retail in our galleries for $490. But to make it more fun we are starting the bidding on the auction at 1 cent. That’s right, ONLY A PENNY! But you’ll need to act quickly, the auction ends Saturday, April 19 at 8 PM Central Time! And don’t worry about doing any framing, Primary Colors of Mykonos is painted on a panel with 1 1/2″ finished sides. You can take the EMBRYO out of the box and hang it directly on your wall. We even provide the hanger and nail!

CLICK HERE to go directly to my auctions.

HAPPY BIDDING and HUGS,

Mikki Senkarik signature JPEG


Peaceful Joy

April 16, 2014

SD3714 Step 5A

Several of you have asked about the color recipes I use for skin tones. Well…..here they are. #1. Cerulean Blue + White. #2. Terra Rosa + MUD (Ultramarine Blue + Alizarin Crimson) + White. #3. Terra Rose + Alizarin Crimson + White. #4. Terra Rosa + White. #5. Mix #4 + White. #6. Mix #5 + White. #7. Terra Rosa + Cadmium Red Light + White. #8. Terra Rosa + MUD + White.

SD3714 Step 5B

The Angel’s arm, hand and face are now painted. The sky is still wet which makes pulling the edges easier. My wrist is braced on a mahl stick to steady my hand as I work on the fine details. If you would like to see the image larger just click on the picture.

SD3714 Step 6

The Angel’s blonde, wavy hair is blocked in with mixes in various proportions of MUD + Cadmium Orange + Ultramarine Blue + White. Then I work on those wonderful wings that suspend her above the wispy clouds. The flat edge of a large Bright brush is perfect to indicate the feathers.

SD3714 Step 7

Terry loves soft pinks and yellows, so I make pale Permanent Rose Lilies part of the bouquet filling our Angel’s arm. The gentle curve of a Palm Frond adds a nice touch.

SD3714 14x14Peaceful Joy        Original Oil Painting       14″ x 14″

Buttery Yellow Daisies complete the flowers. We’re done! Our Angel will have to dry for a few days and then she’ll be off to bring Peaceful Joy to her new home. Have an absolutely delightful day. Hugs,

Mikki Senkarik signature JPEG

Above the Clouds

April 14, 2014

SD3714 Step 1

This is a really fun commission. Terry has collected my work for many years and saw one of the Angels I’d painted around Christmas time. She asked me to do one for her with a simple side view of the face, wanting to give more of an illusion of Angelicness, rather than a “Portrait”. Terry also loves the wings so we’ll show more of them.

SD3714 Step 2

The upper portion of the sky is painted first with a mix of Cobalt Blue + White. Moving down I use Pthalo Blue + White. Pthalo Blue + a touch of Lemon Yellow + White is used at the lowest part of the sky.

SD3714 Step 3

The clouds are painted very soft and subtle so they fall into the background, giving an ethereal look to the piece. Terry wanted some kind of yellow birds. I suggested Goldfinches, our garden is full of them right now. I love the way they hang upside down as they eat at the thistle seed feeders. They are delightful to watch and even more fun to paint!

SD3714 Step 4

Adding three goldfinches makes for a pleasing composition. Two distinctively colored males cavort around the female perched on our Angel’s outstretched finger. Thanks for following along today, hope you’ll come visit again. Hugs,

Mikki Senkarik signature JPEG

Singin’ the Bluebonnets

April 8, 2014

2014-4-4 Driveway garden 2

As you can tell by now my favorite time of year is when the landscape comes alive in the spring. To say I’m wild about Bluebonnets is an understatement! Here’s a shot from our garden.

SD3314 Singin' the Bluebonnets Step 1

Jack suggested I paint a Texas Rooster for my eBay auction this week. And what is better to portray the Lone Star State than a field of Bluebonnets? After sketching up the basic design in a thin oil wash I begin painting the sky and trees in the background. I let a shaft of light stream across the most distant part of the meadow of Bluebonnets. Please remember, you can click on any of the images to see them larger.

CLICK HERE to go directly to my eBay auctions.

SD3314 Singin' the Bluebonnets Step 2

The entire field is covered with a mass of blue. The Bluebonnets in the most distant part are painted with a mix of Ultramarine Blue + a touch of MUD (Ultramarine Blue + Alizarin Crimson) + White. The midportion is pure Ultramarine Blue + White, while the foreground flowers are blocked in with Cobalt Blue + White. Then I come back and add the foliage, interspersing it here and there.

SD3314 Singin' the Bluebonnets Step 3

White caps complete the Bluebonnets. An old weathered fence gives a place for our Rooster to take in the beauty of spring. The reds in his comb and feathers POP against the muted greens of the oak trees in the background.

SD3314 Singin' the Bluebonnets 10x10Singin’ the Bluebonnets   10″ x 10″   Original Oil Painting Embryo

Does this guy have an attitude or What? He is Texas Proud, viewing the world from his perch nestled among the wild Roses. He’s not singing the Blues. NOPE, he’s Singin’ the Bluebonnets! Let his happiness invade your home.


SD3314 Singin' the Bluebonnets 10x10 with tape

Singin’ the Bluebonnets measures 10″ x 10″ and would retail in our galleries for $490. But to make it more fun we are starting the bidding on the auction at 1 cent. That’s right, ONLY A PENNY! But you’ll need to act quickly, the auction ends Thursday, April 10 at 8 PM Central Time! And don’t worry about framing this feisty fella, he is painted on a panel with 1 1/2″ finished sides. You can take the EMBRYO out of the box and hang it directly on your wall. We even provide the hanger and nail!

CLICK HERE to go directly to my auctions.

HAPPY BIDDING and HUGS,

Mikki Senkarik signature JPEG