Archive for March, 2015

Shooting Stars!

March 31, 2015

2015-3-30 Texas Gold Columbine 7

Just have to share a little more from our spring garden. The Texas Gold Star Columbine in the pots on the right have provided nice lacy foliage in this shaded area all summer and winter. We’ve never planted them before, you can imagine our surprise when the blooms opened up a few days ago!

2015-3-30 Texas Gold Columbine 8

Don’t you think they look like Shooting Stars?

2015-3-30 Texas Gold Columbine 5

Here’s another look at one of the delicate blooms. WE LOVE ‘EM!

SD1315 Tranquil Retreat step 8

OK, OK, back to work. We’ll start our painting session today with the sky. My color mixes are: #1. MUD (Ultramarine Blue + Alizarin Crimson) + a little extra Alizarin Crimson + White. #2. MUD + White. #3. Mix #1 + Cadmium Orange + White. #4. Mixture #3 + more White. #5. Ultramarine Blue + White. #6. Pthalo Blue + a touch of Cadmium Orange + White. #7. Pthalo Blue + a tiny bit of Lemon Yellow + White.

This video shows blocking in the blue part of the sky. On a sunny day the upper portion of the sky is darker blue, near the horizon it becomes lighter and greener. Since it’s the source of light in the painting the sky is done first. If the screen doesn’t show just CLICK ON THE LINK to view the video.

Now we’ll add the clouds. They are painted wet-into-wet over the blue. This way I can easily soften the edges of the clouds, making them wispy and fluffy.

SD1315 Tranquil Retreat step 9

I let some of the darker, lower portion of the clouds go behind the windmill and top of the barn roof. This helps to give depth to the painting. You can click on the picture to see it larger. Thanks for following along today. Hope you’ll come back soon. Hugs,

Mikki Senkarik signature JPEG

http://www.senkarik.com

Isn’t Spring Wonderful?

March 30, 2015

2015-3-29 view from kitchen window

We are in the full swing of the season here in Texas. And not only do I get to enjoy the burst of blooms in the garden, the swash of spring Bluebonnets are overflowing onto my canvas! The picture above was taken from our kitchen window. Please remember as you read through my blog, you can click on any of the images to see them larger.

SD1315 Tranquil Retreat step 1

I’m beginning another collaboration today. Susan and Russ definitely want a field covered in a blanket of Bluebonnets with an old barn in the distance. They had some fun requests: rocking chairs, a rooster, a faded Texas flag on the roof of the barn, windmill and sunflowers. I decided it would be inviting to have the rockers on a porch under a Wisteria covered pergola. The arm of the chair seemed the perfect place for Mr. Cock-a-Doodle-Do to perch!

SD1315 Tranquil Retreat step 2

The painting is going to be framed traditionally, so a standard canvas is mounted to a piece of 4-ply cardboard. To see how this was done on a similar piece CLICK HERE.

SD1315 Tranquil Retreat step 3

The initial sketch on the canvas is started by “building” the porch and pergola. Even though most of the top will eventually be covered by Wisteria I have to get the perspective of the structure correct. As in real construction the building must be done before it can be landscaped.

SD1315 Tranquil Retreat step 4

When I looked at the sketch in the mirror placed behind my easel I felt the opening between the upright support posts was too narrow. So I’ve widened it out. Next the old wooden rocking chairs are drawn using the same thin oil wash as the rest of the sketch.

SD1315 Tranquil Retreat step 5

Susan and Russ have a menagerie of “Rescue Babies”. After seeing the pen and ink sketch she wanted to include the young burros, Casper and Jazz. It was a lazy, warm morning and she could only get pictures of them snuggled down on the ground. I thought that would work in great, they could nestle in the Bluebonnets behind the Sunflowers! We’ll add a couple of their miniature horses in the background.

SD1315 Tranquil Retreat step 6

The faded Texas flag on the roof is washed in with thin mixes of Ultramarine Blue + Liquin and Alizarin Crimson + Liquin.

SD1315 Tranquil Retreat step 7

We’re all sketched in and ready to start applying paint in our next session. Hope you’ll come watch! If you would like to receive an email every time I publish a new post please feel free to subscribe to my blog. CLICK THIS LINK and scroll to the upper right side of the page. You will see a heading EMAIL SUBSCRIPTIONS. Just enter your email address and click the button “Sign me up!”  It’s easy. And if you enjoy my blog please CLICK the FaceBook LIKE Button. As we say in Texas, “Much Obliged!

Mikki Senkarik signature JPEG

http://www.senkarik.com

BIG CHANGES!

March 29, 2015

Now let’s start on the BIG changes. First we’re replacing the Salvia and Penstemon with Wine Cups. They are painted in my usual sequence of Flowers First, Leaves Last with mixes of Alizarin Crimson + Magenta + White. If the video screen doesn’t show just CLICK ON THE LINK ABOVE to watch.

LO The Glory Never Fades 5-145 Step 7

The Wine Cups are almost done, I’ll come back later and add the centers.

Time to dry up that stream!

LO The Glory Never Fades 5-145 Step 8More Wine Cups are “planted” in place of the yellow Coreopsis.

A clump of Bluebonnets is nestled next the the Wine Cups and cactus. This video shows the blocking in process.

Putting the final touches on our Texas State Flower.

LO The Glory Never Fades 5-145 Step 9

A few determined Daises emerge from a crevice in the rocks next to the Bluebonnets. Dioxazine Purple + White is used for the flowers in shadow. Highlights will be made with Pure White.

LO The Glory Never Fades 5-145 Step 10

It’s fun to let a few patches of Wine Cups grow in the distance using some of the paint left over from the flowers in the foreground.

LO The Glory Never Fades 5-145 36x48The Glory Never Fades   #5/145    Limited Original

I like our collector’s ideas. What do you think? To see how the piece looked before the embellishing CLICK HERE.   Thanks for following along! Hope you’ll come back and visit our studio soon. Hugs,

Mikki Senkarik signature JPEG

http://www.senkarik.com

How Can Limited be Original?

March 27, 2015

LO The Glory Never Fades 5-145 Step 1

Before I answer the question I would like to show our new readers my painting setup. You can click on the picture to see it larger. The overhead lighting is a simple fluorescent 4 bulb unit with day light bulbs you can purchase at any Home Depot or Lowes. They offer consistent light perfect for painting. All of the studio furniture is on wheels so I can accommodate any size piece. To see how the setup was arranged for me to work on a 6 foot by 8 foot painting in our previous studio CLICK HERE.

LO The Glory Never Fades 5-145 Step 3

Today I’m beginning the enhancing process on one of our Limited Original Giclees. Isn’t that an oxymoron? How can a piece that is part of a Limited Edition be Original? Well, let me explain. Our Limited Originals are hand embellished with Alkyd Oil Paints. I’ve shown them above. Since I can’t do each one exactly alike every piece in the edition is different. This giclee of The Glory Never Fades is going to be a particularly good example of just how different. Our collector wants me to take out the stream and only have rocks, cactus, Wine Cups and Bluebonnets in the foreground.

LO The Glory Never Fades 5-145 Step 2

When we receive the giclee from Miguel, our printer in Florida, I apply two thin coats of UV Varnish. This adds extra protection so the image won’t fade for 250 years. When those are totally dry I start glazing certain areas of the piece to make the color richer. Here I’m using a thin wash of Ultramarine Blue + Liquin to glaze the blue part of the sky. The area to the left of my brush has been glazed. Can you see the difference?

LO The Glory Never Fades 5-145 Step 4

The Live Oak Trees closest to the viewer are repainted. I don’t do anything to the ones in the distance, they are cooler so they drop back. The added texture on the closer trees also makes them pop forward.

LO The Glory Never Fades 5-145 Step 5

The side of the barn illuminated by the sun is repainted as well as the Live Oak to the left of the building. Warmer colors are used near the front edge of the barn and a few strokes of Ultramarine Blue + White are added at the back, behind the open doors. This follows a basic rule that helps to give the appearance of depth in a painting: Warm Colors Come Forward, Cool Colors Go Back. Next the rails of the fence are highlighted where the sun shines on them.

LO The Glory Never Fades 5-145 Step 6

That’s all for today. You’ll see the BIG CHANGES in our next session! Hugs,

Mikki Senkarik signature JPEG

http://www.senkarik.com

Chicklets!

March 25, 2015

We begin today’s session by painting that proud mother hen with colors left over from the floor and containers.

I know several of our readers have mentioned that the addition of audio explanations would be very helpful. I TOTALLY agree. However, here is my situation. I have a backlog of commissions to do, plus our Team Senkarik galleries need more paintings. As an artist that is the most wonderful place to be. God has blessed Jack and I, especially in this economy. I wish I could find the time to do more involved videos with complete audio. At this point these rudimentary ones are the best I can give you. But I’ll keep the idea in mind for when I have a bit more time. Thanks again to all of you for your kind comments and support. Please remember, always feel free to ask questions. You are very important to us and I’ll do my best to answer you.

NOW for the CHICKLETS! Their soft, downy feathers are mixes in various proportions of White + Cadmium Yellow Medium + MUD.  Also a few strokes of Ultramarine Blue + White are added here and there to help round their tiny bodies. The colors are very subtle, you might want to enlarge the video to see the details better.

SC1215 Celebrate Spring Step 13

Mama and her babies are complete! You can click on the image to enlarge the picture.

SC1215 Celebrate Spring Step 14

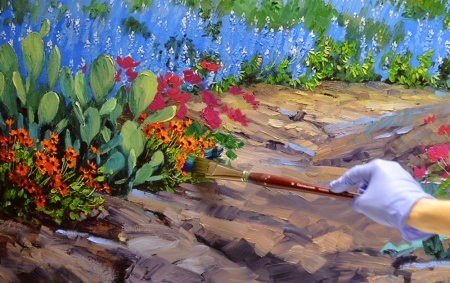
Red Corn Poppies fill the container to the left of the bench. Since the flowers dance above the foliage I don’t follow my usual sequence of Flowers First, Leaves Last. I just start with the bright green foliage made from various mixes of Pthalo Blue + Lemon Yellow. White is added for the lightest mixtures. This is shown at an angle so you can see how I’m working around the edge of the canvas.

SC1215 Celebrate Spring Step 15

The crepe papery flowers are now blocked in with Cadmium Red Deep and Cadmium Red Light. The thick paint is gently “Laid” on the canvas, being very careful not to pick up any of the underlying color on my brush. It would muddy the large, elegant blossoms.

SC1215 Celebrate Spring 14x14Celebrate Spring  14 inches x 14 inches  Original Oil Painting

Thin stems and dark centers finish out the Red Corn Poppies. Magenta Irises to the right of the bench are painted in the same order as the Poppies. Celebrate Spring is ready to head to its new home in Santa Fe! Hope this brought a fresh breath of warm Spring sunshine to those of you living in the frozen north. Hang in there, Spring is on the way! Hugs,

Mikki Senkarik signature JPEG

http://www.senkarik.com

A Pleasant Place to Sit

March 24, 2015

SC1215 Celebrate Spring Step 9

It’s amazing how many different hues you can mix from a limited amount of color. My palette is shown above, the colors on the left are those remaining from yesterday’s session. The paint is ready to lay in the satillo tile. #1: MUD (Ultramarine Blue + Alizarin Crimson) + Liquin. #2: Two shades of Ultramarine Blue + White. #3: Pthalo Blue + White. #4: Pthalo Blue + Cadmium Orange + White. ROW 5: All the globs are made of varying proportions of MUD + Cadmium Orange + a touch of Ultramarine Blue + White. ROW 6: Three mixes of Cadmium Orange + a tiny bit of Pthalo Blue + White. To learn more about our Double Primary Color Mixing System CLICK HERE.

Starting on the floor, covering the entire surface with the light and shadow pattern.

Drawing the perspective lines into the wet paint of the floor. A fine liner brush is used and I work freehand. Bracing against a mahl stick would limit my movement, making it difficult to make straight lines. The camera was placed at an angle to the canvas so my hand won’t obstruct the view. The right side of the image is a bit soft because of this.

https://www.youtube.com/watch?v=cSJXFHa8FqM

Highlighting the edges of the tiles. This gives added dimension to the floor. Notice how the edges are made cooler, or bluer, toward the back and warmer near the foreground. If the screen doesn’t show on any of the three videos just CLICK ON THE LINKS ABOVE to watch.

SC1215 Celebrate Spring Step 10

Here’s another special color that is perfect for Santa Fe, Sevres Green. Mixed with White it compliments the Blue-Purple window perfectly. The shadows are painted first, then I work on the areas illuminated by the sun.

SC1215 Celebrate Spring Step 11

The zig zags along the skirt of the bench are made with a square Bright brush held at a 45 degree angle. You can click on the image to see it larger.

SC1215 Celebrate Spring Step 12

Wouldn’t you love to sit here in the spring sunshine under the Wisteria? It will be even more pleasant when the flowers are added. Come back and you can help me plant them. All you’ll need is your gardening gloves! Hugs,

Mikki Senkarik signature JPEG

http://www.senkarik.com

Southwest Construction Zone

March 23, 2015

SC1215 Celebrate Spring Step 5

Building the adobe structure is our first order of business today. My color mixes are: #1. Ultramarine Blue + White. #2. MUD + Cadmium Orange + Ultramarine Blue + a little White. #3. Mixture #2 + more White. #4. Cadmium Orange + Ultramarine Blue + White. #5. #4 + more White. #6. #4 + even more White.

SC1215 Celebrate Spring Step 6

The sunlit portion of the wall is blocked in first. Then I come back and drag the dark shadows over the lighter paint underneath. This softens the edges of the cast shadows. You can click on the image to see it larger.

SC1215 Celebrate Spring Step 7

The window is a Bluish Purple made of Ultramarine Blue + Dioxazine Purple + White. Dioxazine Purple is one of those special colors I pull out occasionally and add to the palette. It makes a beautiful Periwinkle Blue when mixed with Ultramarine Blue and is perfect for the Wisteria shown in the following VIDEOS!

YEP, That’s right. More Videos today. If the screen doesn’t show up then CLICK ON THE LINK ABOVE. Step One in painting the Wisteria is FLOWERS FIRST!

Step Two: LEAVES LAST

Here I’m delineating the final details on the Wisteria blossoms.

SC1215 Celebrate Spring Step 8

Our Wisteria is finished……I’ll be working on the courtyard floor in the next session. Please do come watch. And if you have any questions all you have to do is ask in the comments section. Have a great evening. Hugs,

Mikki Senkarik signature JPEG

http://www.senkarik.com

Winter’s End

March 22, 2015

SC1215 Celebrate Spring Step 1

Spring is here! Today I’m starting on the second in a quartet of Santa Fe Seasons paintings. It’s a commission for a delightful couple who live in Santa Fe. The first piece was for Winter. If you’d like to see Farolito Shadows CLICK HERE.

SC1215 Celebrate Spring Step 2

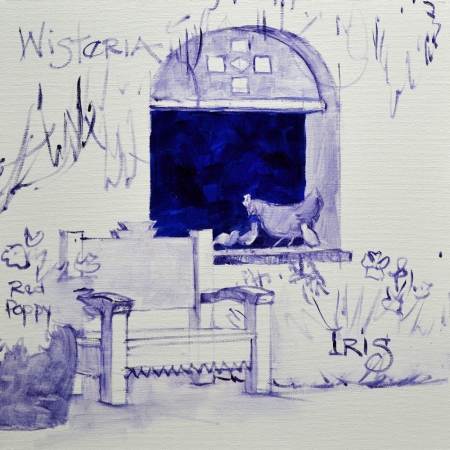
After establishing the ground line of the building I begin drawing the bench. Perspective lines delineate a rectangle on the floor, giving me the corner points for the legs. The sketch is made in a thin oil wash of MUD (Ultramarine Blue + Alizarin Crimson) + Liquin. The canvas has been primed with acrylic rather than gesso, giving it a slightly slick surface. This makes lifting any errant lines off very easy. All I have to do is take a clean brush dipped in thinner and wipe them away.

SC1215 Celebrate Spring Step 3

One special request was a hen with little chicklets. I will admit it’s my term, have called the downy, yellow chicks that ever since I was a little girl!

SC1215 Celebrate Spring Step 4

Well, the basic plan is all sketched up and we’re ready to start painting in the next session. Hope you’ll come watch. If you would like to receive an email every time I publish a new post please feel free to subscribe to my blog. CLICK THIS LINK and scroll to the upper right side of the page. You will see a heading EMAIL SUBSCRIPTIONS. Just enter your email address and click the button “Sign me up!”  It’s easy. And if you enjoy my blog please CLICK the FaceBook LIKE Button. As we say in Texas, “Much Obliged!

Mikki Senkarik signature JPEG

http://www.senkarik.com


The One Thing I Don’t Like About Spring…….

March 20, 2015

Before starting on what I dislike about this season I want to let you know Jack’s newest article is out on Fine Art Studio Online! In it he reveals the key element of selling. To read A Pair of Ears and One Mouth CLICK HERE.

2015-3-13 Rosie and Ruby

The only problem with spring is it’s tax time……..AGAIN. I’m busy getting our stuff together for our CPA, I’ll be back at the easel in a day or two. In the meantime I thought I’d share a few of our garden pictures with you! Rosie and Ruby are doing great! You can CLICK HERE to see when we planted them last month.

2015-3-18 Rosie

Rosie is starting to put out tiny, purple, heart-shaped leaves.

2015-3-13 Garden - end of deck from lower garden

Here I’m standing next to Rosie looking up toward the fountain courtyard. We’re going to put Cherry Tomatoes on the trellis along the back of the deck. All of our Tomatoes are in pots on the deck, just waiting to get their feet in the ground on April 1st! You can click on the picture to see it larger.

2015-3-19 Bluebonnets and knock out roses in pots

We had a surprise in the Bluebonnets along the front walk, a RED one popped up right in the middle of the bed!

2015-3-19 Bluebonnets in kitchen garden

Bluebonnets are thriving in the Kitchen Garden. If you’d like to see it under construction CLICK HERE.

2015-3-19 Bluebonnets and poppies kitchen garden

More Bluebonnets.  Do you think we like them or WHAT? The large leafy plants in the foreground are Red Corn Poppies. They’ll be blooming next!

2015-3-19 Rose arbor - kitchen garden 1

The Petunias are outdoing themselves! I can see them from the kitchen sink. Won’t be long before the Peggy Martin Roses on the arbor start blooming.

2015-3-2 Zippity 2

Meet the newest member of our garden menagerie, “Zippity”. The neatest thing is we’ll always have at least one hummingbird at our feeder 🙂 BIG HUGS,

Mikki Senkarik signature JPEG

http://www.senkarik.com


The Song of Spring

March 17, 2015

SC1115 Step 34

We’ll start with the Coreopsis in the lower right. My mixtures are #1. Cadmium Orange + MUD (Ultramarine Blue + Alizarin Crimson) + Cadmium Yellow Medium. #2. Mix #1 with extra Cadmium Yellow Medium added. #3. Cadmium Yellow Medium + a touch of MUD. #4. Pure Cadmium Yellow Medium. #5. Cadmium Yellow Medium + Lemon Yellow. #6. Three mixes in different proportions of Pthalo Blue + Cadmium Orange + Cadmium Yellow Medium + White. Isn’t it amazing the variety of hues you can achieve with a limited number of colors?

https://www.youtube.com/watch?v=Tp3Y3yO41QM

The video above shows how the Coreopsis are blocked in: Flowers First, Leaves Last. If the video screen doesn’t show up then please click on the link to watch. I’m not sure why the screen is not coming up, maybe one of my computer savvy readers will know the answer.

https://www.youtube.com/watch?v=WwBeagR3P7g

Painting the Coreopsis continues in this video. You’ll have to click on the link above to view this step.

SC1115 Step 35

I pull out a special color for the Salvia, Dioxazine Purple. Mixed with White in several different proportions it makes a nice soft lavender that nestles beautifully with the surrounding greens.

SC1115 Step 36

A different sequence is used to block in the Penstemon. Since the flowers sway on tall stems above the foliage, the leaves are painted first.

SC1115 Step 37

Then the thick paint of the fiery Cadmium Red Light flowers is gently “Laid” on top of the background color. I have to be careful to not pick up any of the underlying paint on my brush as the blossoms are delineated, the greens will dull the red.

SC1115 The Song of Spring 30x40The Song of Spring      30 inches x 40 inches     Original Oil Painting

AND…….The Song of Spring is done! Please remember, to view any of the pictures larger just CLICK on the image. The Song of Spring will have to dry a few days and then it will be off to its new home 🙂 Thanks for following my blog. Hope you’ll visit again soon. Hugs,

Mikki Senkarik signature JPEG

http://www.senkarik.com