Archive for December, 2014

HAPPY 2015!

December 31, 2014

OLYMPUS DIGITAL CAMERAMorning Reflections             Our Personal Collection

Jack and I think this is a wonderful philosophy for the dawning of 2015! The Author is not known. The words were found on a rumpled piece of paper in the billfold of Coach “Bear” Bryant of Alabama after he died in 1982.

The Magic Bank Account

Imagine that you have won the following PRIZE in a contest. Each morning your bank would deposit $86,400 in your private account for your use. However, the prize has rules:

1. Everything that you didn’t spend during each day would be taken away from you.

2. You may not simply transfer money into some other account.

3. You may only spend it.

4. Each morning upon awakening, the bank opens your account with another $86,400 for that day.

5. The bank can end the game without warning; at any time it can say,“Game Over!”. It can close the account and you will not receive a new one.

What would you personally do? You would buy anything and everything you wanted right? Not only for yourself, but for all the people you love and care for. Even for people you don’t know, because you couldn’t possibly spend it all on yourself, right? You would try to spend every penny, and use it all, because you knew it would be replenished in the morning, right?

WELL ACTUALLY, This GAME is REAL …

Are you Shocked ???  Well…….YES!

Each of us is already a winner of this PRIZE. We just can’t seem to see it. The PRIZE is TIME

1. Each morning we awaken to receive 86,400 seconds as a gift of life.

2. And when we go to sleep at night, any remaining time is not credited to us.

3. What we haven’t used up that day is forever lost.

4. Yesterday is forever gone.

5. Each morning the account is refilled, but the bank can dissolve your account at any time WITHOUT WARNING…

SO, what will YOU do with your 86,400 seconds? The choice is yours! Those seconds are worth so much more than the same amount in dollars. Think about it and remember to enjoy every second of your life, because time races by so much quicker than you think. SO….Start “spending”. Don’t complain about growing old, some people don’t get the privilege!

Take care of yourself, be happy, love deeply and enjoy life! Jack and I wish you a wonderful and fabulous 2015!

HAPPY NEW YEAR!

Mikki and Jack signature JPEG

MERRY CHRISTMAS

December 25, 2014

2014-12-25 Best Bet Iris

I hope everyone had an absolutely wonderful Christmas. Jack and I feel so blessed, we’ve had a beautiful day. I spent the morning playing in the garden with my gift. IRISES! I’ve always loved them but have never been able to get them to grow in the areas we’ve lived. One of the first things I noticed when we moved to our new home were the irises growing in the surrounding yards. So the other afternoon when Jack yanked me away from the easel we went to our local nursery. As we parked he said, “I know you love Irises. Go pick out a bunch! MERRY CHRISTMAS!”

2014-12-25 Autumn Circus Iris

Isn’t this one cool? It’s called “Autumn Circus”. The Iris in the first picture is “Best Bet”.

2014-12-25 Iris Garden 3 close up before planting

The iris bed fit perfectly in front of the raised planter along our driveway. They’ll get plenty of sun for lots of purple blooms that will look striking with the yellow Pansies, Bluebonnets and Red Corn Poppies in the taller planter.

2014-12-25 Iris Garden 5

My Christmas Iris are all nestled in their new home, lightly mulched and accompanied by Red Corn Poppies in the blue ceramic container. You can click on any of the pictures to see them larger.

2014-12-25 Yellow Iris in Cactus garden 1

Had a few left over so I tucked them into our Cactus garden in the back yard. Purple Texas Sage and Salvia surround the yellow Iris. That’s “Sparky” our garden mascot! Enjoy the rest of your Christmas Day. AND… please take a moment to say a prayer for everyone in the Military and Law Enforcement along with their families. They sacrifice so much so we can be safe and enjoy our freedom. BIG HUGS,

Mikki Senkarik signature JPEG

http://www.senkarik.com

Just in Time for Christmas

December 24, 2014


SL9714 Step 28

Today we’ll begin with the Sunflowers, my paint is all mixed. #1. Pthalo Blue + White. #2. Two shades of Ultramarine Blue + Lemon Yellow. #3. Three mixtures of Cadmium Yellow + Orange. The darkest mix has a little MUD (Ultramarine Blue + Alizarin Crimson) added. #4. Cadmium Orange. #5 Cadmium Orange + Alizarin Crimson.

SL9714 Step 29

We bought a bouquet of Sunflowers at the farmer’s market last Sunday so I have fresh models! Don’t you think they look nice with our Christmas Amaryllis? Back on the canvas the mass of yellow for the cheery blossoms is blocked in.

SL9714 Step 30

The large leaves are painted with the #2 mixes. A few brushstrokes of mix #1 are made in the foliage to add depth in the mass of leaves. The greens are carefully worked around the yellows, helping to shape the flowers. Then the large dark centers are added. Isn’t it amazing how they immediately look like Sunflowers.

SL9714 Step 31

The last step on the Sunflowers is to highlight the petals illuminated by the sun. Next I move to the large container of Geraniums, blocking in the flowers first.

SL9714 Step 33

Cadmium Red Light accents on the petals and buds finish out the containers of Geraniums on both sides of the steps. Following the same sequence of Flowers First, Leaves Last I begin the Hollyhocks. The mass of blossoms is made with various mixtures of Permanent Rose + White.

SL9714 Step 34

The deep centers of the flowers are delineated with Magenta + Liquin.

SL9714 Step 35

Another special color, Turquoise Blue, is pulled out for the Southwest style bench.

SL9714 Sanctuary of Serenity 36x48Sanctuary of Serenity    36 inches by 48 inches

We’re finished. Just in time for Christmas! Thanks for following along, I appreciate all of you. OH, and my gift from Jack? Watch for my blog tomorrow and find out! MERRY CHRISTMAS,

Mikki Senkarik signature JPEG

http://www.senkarik.com

Bordering the Walk

December 23, 2014

SL9714 Step 23

The statue of St. Francis is accentuated by the dark cedar tree behind. Sunlight pouring into the scene from the left splashes the white sculpture making it glow. The key to making the highlights pop is to paint the shadows on the white marble in darker values of blue and purple.

SL9714 Step 24

Purple Salvia surrounds St. Francis. I pull out a special color for this wonderful high desert flower. Dioxazine Purple makes a pure, vibrant lavender when mixed with White. I add some Ultramarine Blue into the mixture for the flowers behind the sculpture.

SL9714 Step 25

Stately Delphinium are now planted in front of the Salvia. The blossoms are combinations in varying proportions of Magenta + White. Since the flowers grow on tall stalks above the foliage the leaves were painted first with greens made of Pthalo Blue + Cadmium Yellow.

SL9714 Step 26

Rusty Red Coneflowers grow at the base of the tall Delphinium. I go back to my usual sequence of Flowers First, Leaves Last. Mixes of Alizarin Crimson + White and Alizarin Crimson + Cadmium Red Light are used for the daisy like flowers.

SL9714 Step 27

The warmth of the Coneflowers makes them jump forward. And that’s all for today. My painting session was shortened a bit,  Jack said we’re going to go pick out my Christmas present! Can’t wait to see what he’s got in mind! BIG HUGS,

Mikki Senkarik signature JPEG

http://www.senkarik.com


A Well Worn Path

December 21, 2014

SL9714 Step 18

The adobe wall lining the walk to the Mission is painted warmer in the foreground and bluer at the far end. This makes it appear to recede.

SL9714 Step 19

Next the entire area of the walk is covered with mixtures of Cadmium Orange + MUD ( Ultramarine Blue + Alizarin Crimson) + White. Some of the cool colors from the distant mountains are worked into the farthest part of the floor to make it go back. My goal at this point is to establish the light and shadow patterns. The brushstrokes are short and choppy, giving texture to the old pavers.

SL9714 Step 20

Perspective lines are randomly drawn into the wet paint of the floor with a fine liner brush. The lower level in the foreground is made curved to add additional interest to the painting.

SL9714 Step 21

The brush is dipped in a thin wash of MUD + Liquin and the horizontal lines separating the irregular terra-cotta tiles are made.

SL9714 Step 22

Wouldn’t it be so cool if those ancient pavers and the old Mission walls could talk? What stories they’d tell. Please remember, if you’d like to enlarge any of the images just click on the picture. Thanks for visiting today. Hugs,

Mikki Senkarik signature JPEG

http://www.senkarik.com


Painting the Mission

December 20, 2014


SL9714 Step 12

My mixes are laid out and we’re ready to begin working on the Mission. The group of 3 colors around #1 are mixed with Cadmium Orange + a touch of Pthalo Blue + White. The three mixtures above the #2 are Cadmium Orange + a bit of Pthalo Blue + MUD  (Ultramarine Blue + Alizarin Crimson) + White. #3 is Ultramarine Blue + White. #4. Cadmium Orange + MUD.

SL9714 Step 13

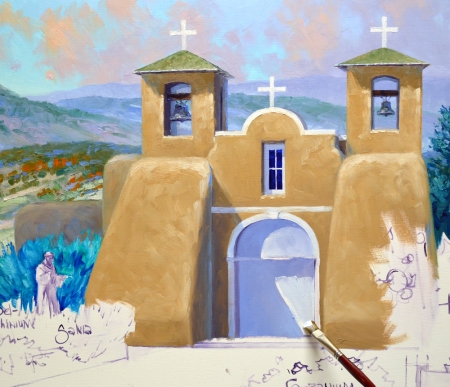
The warm and cool rule applies to the Mission as well as the landscape. I brush a little of the blue mixture #3 into the wet paint of the most distant part of the building. This cools the adobe, making it recede behind the warm tower.

SL9714 Step 14

Some of you have asked to see what my palette looks like during the painting session. To get a better view, just click on the image.

SL9714 Step 15

After the towers are complete the bells are painted. I brace my wrist on the mahl stick to steady my hand as I delineate the details.

SL9714 Step 16

The light on the door is painted with a cool White made of White + Ultramarine Blue. The shadows are White + MUD and a darker shade of White + Ultramarine Blue. Pure White is reserved for the highlights.

SL9714 Step 17

WHEW! All those details on the door took some patience. Now the Mission is painted the cool mountains begin to drop back. Even the sun warmed trees on the closest slope don’t seem nearly as bright. BIG HUGS,

Mikki Senkarik signature JPEG

http://www.senkarik.com


Sun Warmed Clouds

December 18, 2014

SL9714 Step 6

My paint is laid out and I’m ready to begin. The standard colors and brands I use are shown above. You can click on the picture to see it larger. If you would like to learn more about our Double Primary Palette CLICK HERE.

SL9714 Step 7

I start with the blue of the sky. #1. Pthalo Blue + a tiny touch of Lemon Yellow + White. #2. Pthalo Blue + White. #3. Cobalt Blue + White. The area where each mixture meets is blended so the transition across the entire sky is smooth.

SL9714 Step 8

 Now for the sun warmed clouds. My color mixtures are as follows. #1. The highlights of the clouds are Cadmium Orange + Alizarin Crimson + a touch of Ultramarine Blue + White. #2. The middle value is made of Alizarin Crimson + MUD (Ultramarine Blue + Alizarin Crimson) + White. #3. The darkest clouds are MUD + White. Since the sun is coming from the left those wispy clouds on that side are made lighter and warmer. The clouds are painted wet-into-wet over the blue sky which allows me to keep the edges soft.

SL9714 Step 9

The clouds provide a dark backdrop for the white crosses on top of the mission. “Painting Forward” from the sky the most distant mountain is made bluer so it will recede. This follows a simple rule that helps to give the impression of depth in a painting: Cool Colors Go Back, Warm Colors Come Forward. Each mountain layer is made progressively warmer as it comes closer to the Mission.

SL9714 Step 10

The lowering sun warms the trees on the closest mountain. They look a little bright right now but when the flowers in the foreground are added the color will calm down. Large pine trees surrounding the Mission are made of Pthalo Blue + Cadmium Orange + White mixed in various proportions.

SL9714 Step 11

The cedar tree behind the statue of St. Francis will be painted later, after the Mission is complete. Thank you for following along today. Hope to see you again soon. Hugs,

Mikki Senkarik signature JPEG

http://www.senkarik.com


The Taos Mission

December 17, 2014

Sketch Monica and Myron Smith

We’re going to Taos, New Mexico today! My next collaboration is of the beautiful and historic San Francisco de Asis Mission. A sketch is first made for the client’s approval.

SL9714 Step 1

The painting is framed in our Senkarik Signature frame. The white nearest the image is masked off with blue painter’s tape. This will be pulled away when the piece is finished, leaving a straight, clean edge. The Mission is the main focal point so I begin drawing the Southwest architecture with a brush dipped in a thin oil wash of Ultramarine Blue + Alizarin Crimson + Liquin.

SL9714 Step 2

The entire area of the window above the door is washed in with mixes of Ultramarine Blue + Liquin and Ultramarine Blue + Alizarin Crimson + Liquin. I’ll come back later when that is completely dry to add the frame and window panes.

SL9714 Step 3

Now the Mission is drawn I start on the foreground elements. A rectangle is made on the floor surface to determine the placement of the upright posts of the bench. Please remember, you can enlarge this or any of the other images to see them better.

SL9714 Step 4

Bracing my wrist on a mahl stick to steady my hand I sketch the statue of St. Francis located in front of the Mission.

SL9714 Step 5

The oil wash is complete. I’ll make a few adjustments while painting but this drawing gives me a basic “Road Map” to follow as I work. If you would like to receive an email every time I publish a new post please feel free to subscribe to my blog. CLICK THIS LINK and scroll to the upper right side of the page. You will see a heading EMAIL SUBSCRIPTIONS. Just enter your email address and click the button “Sign me up!”  It’s easy. And if you enjoy my blog please CLICK the FaceBook LIKE Button. As we say in Texas, “Much Obliged!

Mikki Senkarik signature JPEG

http://www.senkarik.com

Three Little Gems

December 14, 2014

SL9614 Jewelry Box step 13

One of our readers wanted to know what brand of Alkyd Oil Paints we use. Jack and I like Winsor-Newton Griffin Alkyds which can be  purchased at JerrysArtarama.com  There is no need to use any mediums or grounds with the Alkyds and they come in the very same colors as regular oil paints. If you don’t want the Alkyds to dry quite as quickly they can be intermixed with regular oil paints! OK, back to the easel. The flowers are completely dry so we’ll work on Gragson first. I pull out a special color for his beautiful coat, Ivory Black. White is mixed in for the highlights on his shiny fur. I let a little of the blue from the container behind him reflect onto the side of his face and back.

SL9614 Jewelry Box step 14

Rumsfeld is next. I love his eyebrows, doesn’t he remind you of Donald Rumsfeld? His coat is painted with various mixtures of Ultramarine Blue + Cadmium Orange + White. Some of the Black left over from Gragson is used on Rumsfeld’s shoulder. Since the sun is shining from the upper left the catch light in his eye is placed at the edge of the pupil at 11 o’clock. Light transmits through the cornea, illuminating the iris on the opposite side. So the area of the brown iris from 5 o’clock to 7 o’clock is made lighter. You can see this better if you’ll enlarge the picture, just click on the image.

SL9614 Jewelry Box step 15

Now, pretty little Baby is painted. I let her fluffy tail hang over the edge of the box which adds to the dimension.

SL9614 Three Little Gems Front

“Three Little Gems” is complete. Don’t you think that’s a nifty gift idea Denise came up with?

SL9614 Three Little Gems Left side


SL9614 Three Little Gems Back with hinges

Here’s a couple of pictures from other angles so you can see how the design works. The most fun thing is Denise is going to make a unique piece of Jewelry for Maria. So she’ll have a gift within a gift! Isn’t that so cool? Hugs,

Mikki Senkarik signature JPEG

http://www.senkarik.com


Alkyd Oils

December 12, 2014

SL9614 Jewelry Box step 7

I’m using Alkyd Oil Paints for the Jewel Box. They come in exactly the same colors as regular Oil Paints but dry much, much faster. Unlike Acrylics the colors remain true, they stay exactly as you lay them down and don’t darken as they dry. The Amaryllis in the background? They are part of our living Christmas Decorations in the studio! We have several: they were planted in pots, two at a time, 10 days to two weeks apart. This way we’ll get to enjoy the gorgeous blossoms for a long time. If you’d like to enlarge this or any of the other pictures just click on the image.

SL9614 Jewelry Box step 8

The critters are perched on a tile floor that makes up the top of the box. I paint it exactly like I do on canvas, covering the entire area with the light and shadow areas.

SL9614 Jewelry Box step 9

Then the lines separating the tiles are pulled into the wet paint of the floor. I have to work quickly, the paint is drying fast! I’m totally not used to that 🙂

SL9614 Jewelry Box step 10

The edge of the lid serves as the edge of the tile. Then the side is painted in an adobe color with textured brushstrokes. I leave the washed in area of blue-greens at the bottom. It’s now dry and will be the base color for the Geraniums we’ll plant here.

SL9614 Jewelry Box step 11

A mass of Pink Petunias fill the ceramic containers behind our “Fur Babies”. The flowers are blocked in with different combinations of Permanent Rose + White.

SL9614 Jewelry Box step 12

Geraniums line the bottom portion of the Jewelry Box. I need for all of the flowers to dry before I can do any more work. Hope you’ll come visit our next session; I’ll be painting Baby, Rumsfeld and Gragson. Hugs,

Mikki Senkarik signature JPEG

http://www.senkarik.com