Archive for October, 2015

Romance of Roses

October 30, 2015

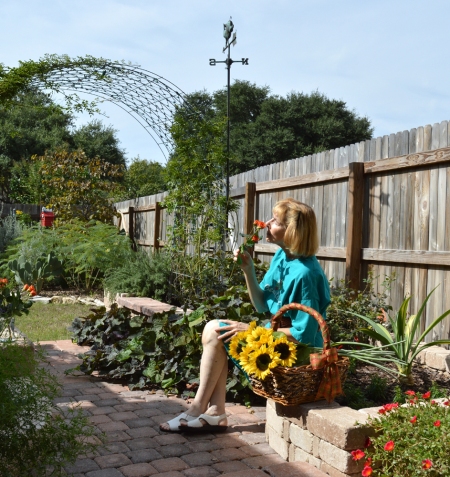
mikki with rose 1 100dpi

My collector still wants to have a figure near the door. He originally suggested a lady standing next to the door. I felt that would be too static. The tall archway, the upright figure, the door and the chili ristra would line up almost like fence posts. Then I thought what about a woman sitting on the steps taking in the fragrance of flowers in a pot by the porch? David said, “Sounds good!”

Aren’t digital cameras wonderful? I set ours up on a tripod and began taking “Selfies!” The afternoon light in our garden was perfect. As I was taking pictures Jack came up with the idea for me to be smelling a rose. Ahhhh, how Romantic. And what better than to be sitting beside a basket filled with fresh sunflowers and roses?

SJ4615 step 14

The area where I painted out the basket weaver is now dry. My first step is to lightly pencil in the basic shapes of the figure. You can click on the picture to see it larger.

SJ4615 step 15

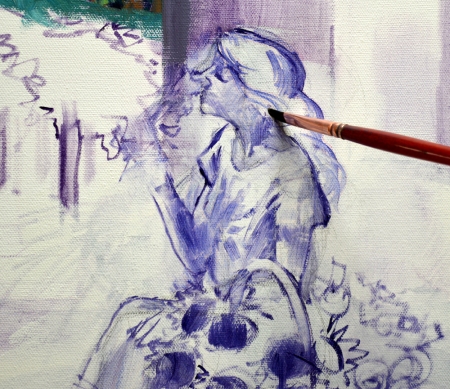
Now I start drawing the figure in a thin oil wash made of MUD (Ultramarine Blue + Alizarin Crimson) + Liquin. Our lady will be in a white dress, I’ve shortened the sleeves and lengthened the skirt.

SJ4615 step 16

The light and shadow pattern on the face is washed in.

SJ4615 step 17

The fragrant rose is washed in with Alizarin Crimson + Liquin. I love how the shadow of the flower is cast on the bodice of the dress. My heart sang when I saw it in the original photo.

SJ4615 step 18

The darkness of the courtyard wall in the distance will accentuate the dress and face of our lady basking in the sun and enjoying the “Romance of Roses”. I wonder what thoughts are floating through her imagination.

SJ4615 step 19

So here’s the full painting…….What do you think? The red of the roses and the chili ristra are going to look so nice on either side of the Turquoise door.

OLYMPUS DIGITAL CAMERA

NEWS FLASH! Several of you have asked me to let you know when our art marketing books go on sale. Well, here you go. Our online publisher is offering a 20% savings on ALL of our books in print at Lulu.com. But you have to act quickly, the sale ends at Midnight on Sunday, November 1. Just use the code ZOMBIE20 when you check out. CLICK HERE to see all four pages of our books. Please remember, the savings is only on the print versions of the books, not the ebooks. Hugs,
Mikki Senkarik signature JPEG

http://www.senkarik.com

Change of Plan

October 29, 2015

First of all I want to let you know Jack’s newest article is out on FASO.com. CLICK HERE to read UnDefeated.

SJ4615 step 9

We begin with the sky. Since it’s the main source of light for the painting, it determines the mood for the entire piece. Cobalt Blue + White is used for the upper portion, while Pthalo Blue + White is reserved for the lighter part of the sky nearest the horizon. Please remember as you read through my blog you can enlarge any of the pictures by clicking on the image.

SJ4615 step 10

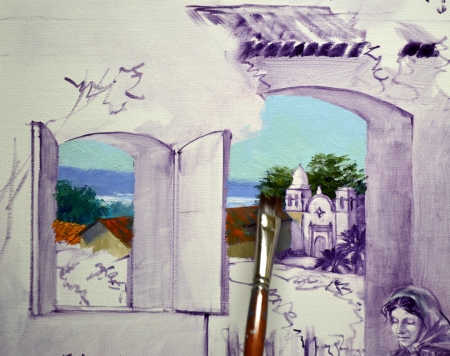
Now I “paint forward” from the sky, adding the mountains and distant sliver of Monterey Bay gleaming in the distance. Humongous Monterey Cypress trees grow behind the mission. I’ve moved these magnificent trees just a little to accentuate the facade and bell towers of the Carmel Mission.

SJ4615 step 11

Painting the stately Mission brings back such warm memories of living in Carmel. I can hear the crashing waves of the ocean in my mind and almost feel the cool sea breeze on my face as I paint. Mixes of Cadmium Orange + Ultramarine Blue + White are used for the sunlit portion of the building. I add MUD (Ultramarine Blue + Alizarin Crimson) into those mixtures for the shadow areas. If you would like to learn more about our Double Primary Color Mixing System that Jack developed CLICK HERE.

SJ4615 step 12

Now for the change of plan. My collector decided the basket weaver just wasn’t working for him and his wife. He still wants to include a figure……so I need to paint out the lady working on the basket. I use White Winsor Newton GRIFFIN Alkyd Oil paint to cover the initial sketch. I can’t use Acrylic, the water based paint over the oil wash would cause cracking in years to come.

SJ4615 step 13

The figure is covered, now all I have to do is wait until the White is dry to come back and sketch over it. Fortunately Alkyd Oil Paint dries very quickly, it should be ready in a day or so. I’ll finish the window panes in another session, have to complete the vineyard in the background first! We’ve had almost one hundred new people sign up to follow my blog today. WOW! I’d like to WELCOME every one and say THANK YOU! Please, always feel free to ask questions. I’ll answer them as best I can. HUGS,

Mikki Senkarik signature JPEG

http://www.senkarik.com

Courtyard with a View

October 27, 2015

Sketch Boggs Courtyard 2

This piece is going to hang across the room from Cool, Cool Water.  My collector wants a courtyard with the feel of a Spanish villa looking out over vineyards and a distant Mission. David also thought it would be neat to include a basket weaver on the porch by the door.

SJ4615 step 2

The basic plan is sketched on the canvas with a thin oil wash made of MUD (Ultramarine Blue + Alizarin Crimson) + Liquin. I begin with the foreground elements and building on the right. Perspective lines are drawn to aid in constructing the steps and planters.

SJ4615 step 3

After drawing the door, work begins on the basket weaver. Her position will determine the placement of the opening in the courtyard wall. You can see how my mahl stick hooks over the top of the cardboard holding the canvas. I brace against it to steady my hand as I draw.

SJ4615 step 5

Now for the archway. I’ve planned for the darkness of the side wall of the opening to accentuate the sunlight illuminating the basket weaver’s face.

SJ4615 step 6

We decided the Carmel Mission, one of Jack’s and my absolute favorites, would work perfectly in the distance. Living near there several years ago, we loved to visit the Mission and meander through the gardens. It was always so relaxing and tranquil.

SJ4615 step 7

The chili ristra is washed in with Alizarin Crimson + Liquin. Using a clean brush I go back in and lift off the wash to delineate the individual peppers.

SJ4615 step 8

The fountain finishes our initial oil sketch. Please remember as you read though my blog, if you’d like to see this or any of the other images larger just click on the picture. We’ll begin painting in the next session, hope you’ll come join us. You can receive an email every time I publish a new post if you subscribe to my blog. CLICK THIS LINK and scroll to the upper right side of the page. You will see a heading EMAIL SUBSCRIPTIONS. Just enter your email address and click the button “Sign me up!”  It’s easy. And if you enjoy my blog please CLICK the FaceBook LIKE Button. As we say in Texas, “Much Obliged! Hugs,

Mikki Senkarik signature JPEG

http://www.senkarik.com

Tending the Garden

October 23, 2015


We’ll start off with a VIDEO today. I’m painting the colorful Indian Corn in the basket below Abigail.

SJ4515 Tending the Garden step 16

Moving to the Hollyhocks, the leaves are worked around the pink flowers helping to give shape to the individual blooms. The foliage is a bright green mixed of Pthalo Blue + Lemon Yellow + White. The large blossoms are made of several combinations of Permanent Rose + White.

SJ4515 Tending the Garden step 17

Like the Hollyhocks, the Sunflowers are blocked in Flowers First, Leaves Last. Mixes of Cadmium Yellow Medium + MUD (Ultramarine Blue + Alizarin Crimson), Cadmium Yellow Medium + Lemon Yellow and pure Cadmium Yellow Medium are used.

SJ4515 Tending the Garden step 18

After the leaves are painted large, dark centers are added to the blooms. Can’t you just hear them announcing with joy, “We’re SUNFLOWERS!”

SJ4515 Tending the Garden 14x14

A couple of pumpkins complete our fall setting. Abigail is content to bask in the sun, Tending the Garden! If you’d like to enlarge the picture just click on the image. Thank you for following along, hope you’ll come back to our studio soon. I’ll be starting a new commission in my next session. Hugs,

Mikki Senkarik signature JPEG

www.Senkarik.com

Sweet Abigail

October 22, 2015

SJ4515 Tending the Garden step 10

The little Southwestern bench under the window is painted with several different shades mixed from Pthalo Blue + White.  My wrist is braced against the mahl stick to steady my hand as I work. What is a mahl stick? CLICK HERE to find out.

SJ4515 Tending the Garden step 11

I love geckos, they certainly add a Santa Fe flavor to the scene. This one is drawn into the wet paint on the back of the bench with some of the darker Pthalo Blue + White mix. I’m resting my hand against the unpainted portion of the piece for stability.

SJ4515 Tending the Garden step 12

Now for that sweet Abigail. Ivory Black is used for her body. I add a little White for the highlights on her shiny coat while reflected lights are made with a mix of Ultramarine Blue + White.

SJ4515 Tending the Garden step 14

The tile floor is first totally covered with the light and shadow pattern. Perspective lines that separate the tiles are then drawn into the wet paint. Watch the process in the following VIDEO……..

As Kermit the frog would say, “We’re moving right along.” We’ll finish up in the next session. Hope you’ll come watch. Hugs,

Mikki Senkarik signature JPEG

www.Senkarik.com


Trumpets and Spice!

October 21, 2015

SJ4515 Tending the Garden step 5

The adobe wall is painted first with several mixes of Cadmium Orange + Ultramarine Blue + White. MUD (Ultramarine Blue + Alizarin Crimson) is added for the darker shadow colors. Then the spicy strands of garlic are worked, wet into wet, into the fresh paint of the wall. Some of adobe color is used, I’ve just added A LOT of extra white. To learn more about our Double Primary Color Mixing System that Jack developed CLICK HERE.

SJ4515 Tending the Garden step 6

After delineating the details of the garlic, the lintel and window are painted with mixes of Ultramarine Blue + a tiny touch of Dioxazine Purple + White. I’ve waited until the washed in area behind the window is completely dry. This make its much easier to drag the frame and mullions over the dark.

SJ4515 Tending the Garden step 7

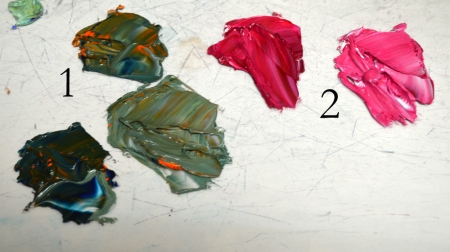
We’re ready to paint the Trumpet Vine. My colors are as follows. #1. Cadmium Orange. #2. Cadmium Orange + Alizarin Crimson. #3. This is the same mix as #2 but has more Cadmium Orange. #4. The foliage color is combinations in different proportions of Sap Green + Cadmium Yellow Medium.

SJ4515 Tending the Garden step 8

The teal ceramic container on the window sill is filled with Magenta Petunias. The mass of Trumpet Vine flowers is now blocked in. I jumble the color together, when the vine is finished the blossoms will appear more vibrant.

SJ4515 Tending the Garden step 9

Leaves and hanging tendrils complete the Trumpet Vine. If you’d like to see this or any of the other images larger, click on the picture. We’re done for today, hope you’ll come back soon to follow our progress. Hugs,

Mikki Senkarik signature JPEGwww.Senkarik.com

Autumn is Here…

October 18, 2015

SJ4515 Tending the Garden step 1

The cool breezes of fall are so welcome after this summer’s heat. Our garden is perking up, getting ready to bloom again. I love this time of year in Texas. To celebrate let’s begin on an autumn themed piece. Actually this is one of a series of the four seasons. Since it’s fall it seemed quite appropriate to begin with the corresponding piece. One of the neatest things about this commission is I’m working Jeana’s fur babies into the compositions. We start with a pen and ink sketch, my “road map” to follow.

SJ4515 Tending the Garden step 2

The painting is 14 inches tall by 14 inches wide on a gallery wrapped canvas. The painted image will extend on to the sides. The canvas is attached to a piece of double ply cardboard, it will be easier to handle when it’s wet. The window is lightly sketched with a thin oil wash of MUD (Ultramarine Blue + Alizarin Crimson) + a liberal amount of Liquin. Then the southwestern style bench is drawn. Notice the perspective lines I use as a guide.

SJ4515 Tending the Garden step 3

The chili pepper ristras are washed in with Alizarin Crimson + Liquin. I’ll paint over them with opaque oils when the wash is dry. Please remember as you go through my blog, you can click on any of the pictures to see them larger.

SJ4515 Tending the Garden step 4

Our basic plan is sketched on the canvas. We’ll be applying paint in the next session, hope you’ll come watch. If you would like to receive an email every time I publish a new post please feel free to subscribe to my blog. CLICK THIS LINK and scroll to the upper right side of the page. You will see a heading EMAIL SUBSCRIPTIONS. Just enter your email address and click the button “Sign me up!”  It’s easy. And if you enjoy my blog please CLICK the FaceBook LIKE Button. As we say in Texas, “Much Obliged! Hugs,

Mikki Senkarik signature JPEG

http://www.senkarik.com

Embellishing Magic of Santorini

October 15, 2015

LO Magic of Santorini step 1

Several of you have asked if I stretch my giclees on canvas before they are embellished. The short answer is NO. As you can see in the picture above I just tape them onto a sheet of double ply cardboard. When the piece is completely dry I can roll it up, stick it in a shipping tube and send it to the collector. They have it stretched when the giclee is framed.

Before I begin embellishing I apply two thin coats of UV varnish to the giclee. This helps to protect it from any fading. After that is dry I start the embellishing process. The first step is to apply thin, oil glazes to enhance colors. The oil glazes are mixed with a small amount of paint and a liberal portion of Liquin. Cobalt Blue + Liquin is used to make the dome of the distant church richer.

LO Magic of Santorini step 2

I’ve glazed the gates, door and shutters with Ultramarine Blue + Liquin. Now the white walls in the sunlight are repainted. The far wall by the gate is made bluer so it will recede. Up by the door the White has a little touch of Ultramarine Blue + Cadmium Orange. Pure White is reserved for the portion of this wall that is closest to the viewer. Please remember, if you’d like to enlarge any of the images just click on the picture.

LO Magic of Santorini step 3

Bougainvilleas are repainted with mixes in various proportions of Permanent Rose + White.

LO Magic of Santorini step 4

Now for the sunny, yellow flowers in the foreground. I’m using paint leftover from the Coreopsis in my previous painting: Cool, Cool Water.

LO Magic of Santorini step 5

The Geraniums are highlighted with Alizarin Crimson + White, Cadmium Red Medium and Cadmium Red Light + a touch of White.

LO Magic of Santorini step 6

The agave is also repainted with several greens leftover from Cool, Cool Water. If you’d like to see it just CLICK HERE.

LO Magic of Santorini 1-45 16x20

The Magenta Petunias are painted and TA DA!!!! The Magic of Santorini is even more magical. Take a moment to scroll back up to the first image and you can see the difference. As soon as this is dry enough it will be whisked off to it’s new home. As we say in Texas, I’m MUCH OBLIGED to have you following along on my blog. Hugs,

Mikki Senkarik signature JPEGwww.Senkarik.com

Texas Wildflowers

October 13, 2015

OLYMPUS DIGITAL CAMERA

I love our Texas spring and the abundance of wildflowers found in the Hill Country. It looks as if God has sprinkled the landscape in Easter egg colors. Jack and I took this picture of a field of Drummond Phlox a few years ago, just around the corner from our home.

SJ4415 Cool, Cool Water step 27

So let’s paint some Phlox. #1. The foliage mixes are various combinations of Pthalo Blue + Cadmium Orange + White. #2. Permanent Rose + White will be for the blossoms.

SJ4415 Cool, Cool Water step 28

I follow my usual sequence to block in the Phlox, Flowers First, Leaves Last.

SJ4415 Cool, Cool Water step 29

The foliage is worked around the blossoms. By using this sequence the flower color remains crisp and clean. If I were to paint the leaves first and then the flowers my brush would pick up the green and muddy the pink.

VIDEO! Next I add the White Prickly Poppies to our grouping of wildflowers in the foreground.

This was also taken near our home. If you’ve never experienced spring in Texas you’ve really missed an awesome display. Indian Paintbrush and Bluebonnets are staples in our cornucopia of Texas wildflowers.

SJ4415 Cool, Cool Water step 31

Let’s plant some! The blossoms of the Indian Paintbrush are made of Permanent Rose + Cadmium Red Light + White.

SJ4415 Cool, Cool Water step 32

Several shades of Cobalt Blue + White are used for the Bluebonnets, our Texas state flower.

SJ4415 Cool, Cool Water 24x36

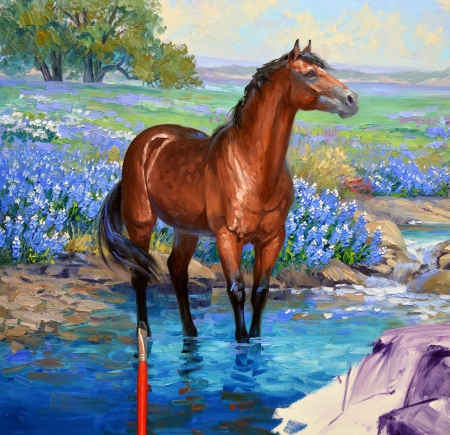
After painting the yellow Coreopsis I add some more bluebonnets behind the horse. The green above his back was jumping forward, now the blue drops into the background. AND…..we’re done! Listen carefully, can’t you just hear the music of the Cool, Cool Water cascading over the falls? I definitely think the horse is enjoying it! I’d like to thank all of you for your wonderful comments. This has been a fun piece to do! Big Hugs,

Mikki Senkarik signature JPEGwww.Senkarik.com

Cascade of Water

October 12, 2015

SJ4415 Cool, Cool Water step 21

Refreshing little streams are found throughout the Texas Hill Country. After establishing the upper portion of the babbling brook I block in the limestone rocks of the waterfalls.

SJ4415 Cool, Cool Water step 22

Next the tumbling water is dragged over the rocky drop.

SJ4415 Cool, Cool Water step 24

Got my colors all set to paint the pond in the foreground. #1. Two mixes of Ultramarine Blue + White. #2. A couple of mixtures of Pthalo Blue + Ultramarine Blue + White. #3. Two different shades of Pthalo Blue + Cadmium Orange + White. #4. White + Ultramarine Blue. #5. White + Pthalo Blue. #6. White + Turquoise Blue. #7. Pthalo Blue + White. #8. Two variations of Turquoise Blue + White.

VIDEO! Painting the cool pool for our big bay to enjoy.

SJ4415 Cool, Cool Water step 25

Now the water is painted I finish the horse’s legs.

SJ4415 Cool, Cool Water step 26

Sunlight, streaming in from the right, splashes across the surface of the pond to spotlight the horse.

VIDEO! Blocking in the rocks and cascade of water in the front right corner. Tomorrow we’ll be planting all of the wildflowers on the limestone outcropping. Hope you’ll come watch. Bring your gardening gloves and give me a hand. Hugs,

Mikki Senkarik signature JPEGwww.Senkarik.com