Archive for October, 2014

Red Tag Door

October 31, 2014

SJ9014 Step 7

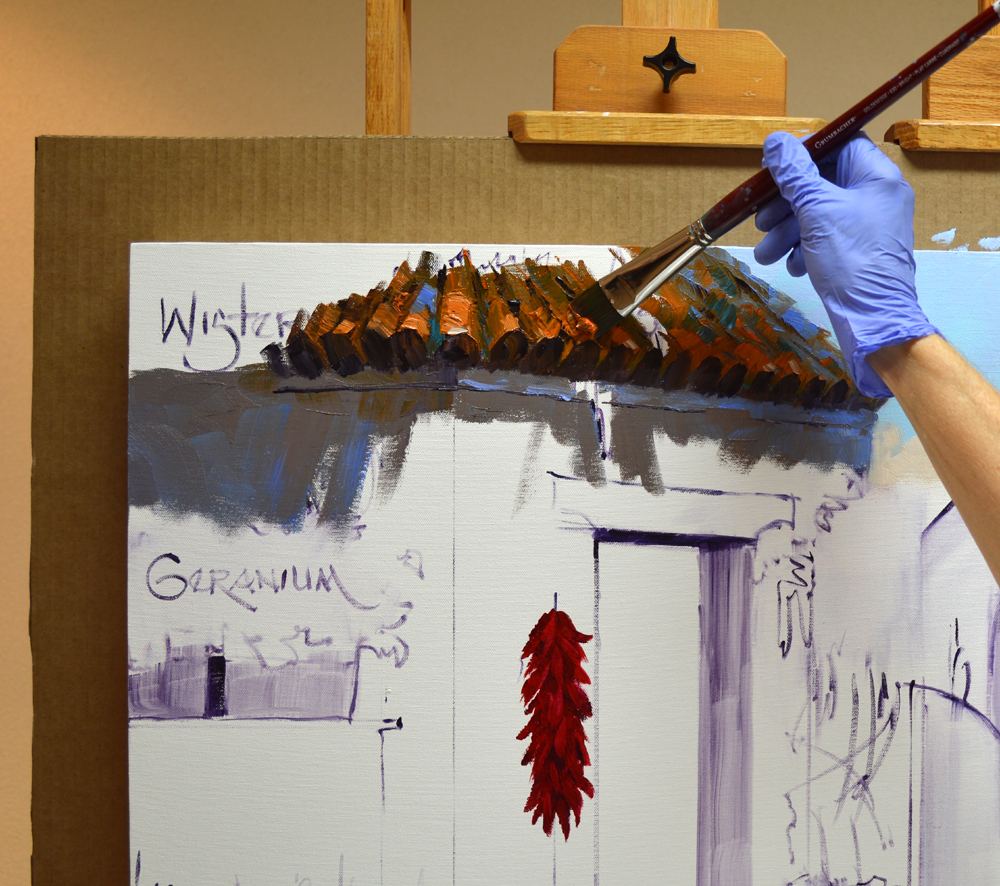
The rock walls of our cottage by the sea are mixes of Cadmium Orange + a tiny bit of Pthalo Blue + White.  Ultramarine Blue + Alizarin Crimson is added into the mixtures for the shadows. Then the twisted Wisteria trunk is drawn into the wet paint of the walls all the way around the sides of the gallery wrapped canvas.

SJ9014 Step 8

Many of my readers have asked to see my palette as I’m working. The colors lined up on the left are saved from the previous session. That way if I need to go back and do any touch up I don’t have to remix them. The mixes for the Wisteria are laid out underneath my regular colors along the top of the palette. The purples are combinations of Ultramarine Blue + Dioxazine Purple + White and Dioxazine Purple + White. The greens are made of various proportions of Pthalo Blue + Cadmium Yellow Medium + Lemon Yellow.

SJ9014 Step 9

I get up on a step stool to paint the top edge of the canvas. You can see our studio set up here. My palette rests on top of a 2 shelf culinary cart. The taboret is a smaller culinary cart that also has a couple of shelves. Everything is on wheels so it’s easy to adjust to any size painting. To see this better you can enlarge the picture by clicking on it.

SJ9014 Step 10

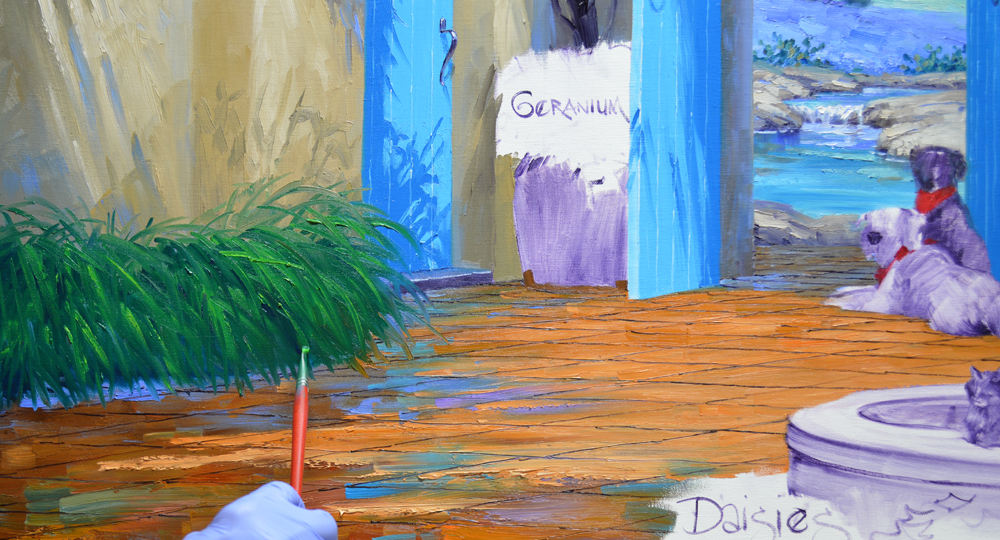
The basic purples of the Wisteria blooms were painted first. Then the green leaves were painted around the masses of purple, helping to shape the dangling blossoms. The final step is to add individual flower petals.

SJ9014 Step 11

One of the neatest things about collaborating with clients on commissions is matching special requests for color. Teri emailed me a picture of the red tag that our gallery in Santa Fe places on the wall by paintings that have sold. She said that’s the color of red I what the door to be. Well I certainly have to agree with her, I like the color of those red tags too. Especially when they’re by my pieces 🙂 To achieve that shade of red I’ve mixed Cadmium Red Medium + Alizarin Crimson + White. More White is added for the lighter mixture.

SJ9014 Step 12

The shadow area is painted first, then the sunlit portion of the door is covered.

SJ9014 Step 13

Add the door handle, along with the lines separating the boards, and we’re done for today. I had a question about the size of this piece, it measures 14 inches by 14 inches. Hope you’ll always feel free to ask questions. As I’ve been writing this blog we’ve been handing out goodies to all the ghost and goblins who’ve been knocking on our door! Have a HAPPY HALLOWEEN.

Mikki Senkarik signature JPEG

A Sunny Day at the Coast

October 30, 2014

SJ9014 Step 1

Let’s go to the coast to work on my next commission. Like the previous piece, this image is going to extend over the sides. If you would like to see how that canvas was prepared CLICK HERE.

SJ9014 Step 2

The blue field of the sky is done first.  Cobalt Blue + White is used at the top of the canvas, while Pthalo Blue + White makes the portion nearest the horizon. Then the clouds are painted, wet-into-wet over the blue. This keeps the edges soft and feathery.

SJ9014 Step 3

The water in the distance is made duller with mixes of Ultramarine Blue + a touch of MUD + White. MUD is a deep purple made by mixing Ultramarine Blue + Alizarin Crimson. CLICK HERE to learn why we can it MUD! Moving closer to the foreground the water becomes progressively more intense in color. That in the middle distance is Ultramarine Blue + Pthalo Blue + White. Turquoise Blue + White makes up the bright water nearest the terrace. I follow this simple rule: Muted Colors Go Back, Bright Intense Colors Come Forward to give a feeling of depth.

SJ9014 Step 4

The rocky bluffs are now blocked in. The sun catches the tops of the rocks, giving them a warm glow.

SJ9014 Step 5

The crashing surf is lightly dragged over the water behind. The soft edges give the impression of movement. You can click on the image to see it larger.

SJ9014 Step 6

A Monterey Cypress Tree with its distinctive twisted trunk is a stalwart sentinel atop the sun washed rocks. Thank you for following along today, hope you’ll visit again soon. Hugs,

Mikki Senkarik signature JPEG

Fur Babies

October 27, 2014

SJ8914 Step 49

Now the fountain has dried a bit overnight we’ll add the cascade of falling water. The thick paint is dragged straight down, letting the brush skip and bump over the drier paint underneath.

SJ8914 Step 50

Phil and Denise have three “Fur Babies”. Let’s start with Gragson who is a Brussels Griffon. After painting the red kerchief, Ivory Black is used for his thick coat. A bit of white is mixed in for the highlights.

SJ8914 Step 51

Gragson has such a cute face and huge brown eyes. A touch of Ultramarine Blue + White along the right side of his face helps to round his head. To enlarge this or any of the other pictures just click on the image.

SJ8914 Step 52

Rumsfeld is next. His body is painted with various mixes of Ultramarine Blue + Cadmium Orange + MUD + White.

SJ8914 Step 53

Moving to his head the basic planes are blocked in before delineating the details of his face.

SJ8914 Step 54

I love Rumsfeld’s eyebrows and moustache! Don’t you?

SJ8914 Step 55

Baby is a Maine Coon Cat. Ivory Black and some of the adobe mixtures from the walls are used for her fluffy coat.

SJ8914 Step 56

The “Fur Babies” are done. One of my favorite things about collaborating with collectors is adding special little touches like this to their paintings. It’s been so fun getting to “meet” Phil and Denise’s little darlings.

SJ8914 Is That the Dinner Bell 30x36
Jack was looking at the painting and said those babies look like someone just opened a bag of food! Don’t you think he had a wonderful idea for the title, “Is that the Dinner Bell?” Thank you so much for following along. And please remember, if you ever have any painting questions don’t hesitate to ask. The main purpose of my blog is to help fellow artists learn and get better. HAPPY PAINTING!

Mikki Senkarik signature JPEG

Carpe Diem

October 26, 2014

SJ8914 Step 41

“Seize the Day!” What about seize the Day Lilies? For those of you who haven’t been following along we painted the long, thin leaves of the Day Lilies in a previous session. This is a departure from my usual sequence of Flowers First, Leaves Last. Since the bright blooms dance above the foliage I’ve gone ahead and blocked in the green first. Now the thick paint of the blossoms is gently “Laid” over the background. Mixes of Alizarin Crimson + Cadmium Orange, Cadmium Orange and Cadmium Orange + Cadmium Yellow Medium are used.

SJ8914 Step 42

I delineate the deep centers of the Day Lilies with a small brush dipped in a thin mix of Magenta + Liquin.

SJ8914 Step 43

Several of you have asked to see my palette as I paint. I save dabs of my colors on the left side. They stay usable for about 3 days, long enough to retrieve some if I need to go back and touch up any areas on the painting. The regular colors of our Double Primary Mixing System are along the top edge of the glass palette. The mixes for the fountain are on the right, next to my brushes. These are various combinations of Viridian Green + Cadmium Orange + White. MUD is added to make the darker mixes. If you’d like to know more about our Mixing System CLICK HERE.

SJ8914 Step 44

The water in the lower basin of the fountain reflects on to the bowl above. A thin sliver of Ultramarine Blue + White along the bottom edge gives the impression of the reflection. It also serves to make the bowl appear round. You can enlarge any of the pictures by clicking on the image.

SJ8914 Step 45

The “Pineapple” top of the fountain is now rendered. My wrist is braced against the Mahl Stick, steadying my hand while painting the details. What’s a Mahl Stick? You can find out by CLICKING HERE.

SJ8914 Step 46

I’m making a slight change from the original sketch by growing a leafy water plant in the fountain. It gives Baby, the kitty, something to nestle under.

SJ8914 Step 47

Rusty Red-Orange Daisies surround the fountain. They are blocked in with mixes of Magenta + White and Magenta + Cadmium Red Light.

SJ8914 Step 48Yellow centers are added and pure Cadmium Red Light accentuates the petals of the Daisies. Tomorrow we’ll concentrate on Phil and Denise’s “Fur Babies”. Have a great day today and make the most of every single moment. Remember; yesterday is history, tomorrow is a mystery. Today is a gift from God, that’s why it’s called the Present! CARPE DIEM!

Mikki Senkarik signature JPEG

Geraniums, Chilis and Canna Lilies

October 25, 2014

SJ8914 Step 34

What do Geraniums, Chili Ristras and Canna Lilies have in common? We’re going to paint them all today! Let’s begin with the Geraniums. You can see the sequence here. The blossoms are blocked in first, #1. Mixtures of Cadmium Red Deep + Magenta and Cadmium Red Deep are used. Then the leaves are painted around the red blooms defining their basic shapes, #2. Various combinations of Pthalo Blue + Lemon Yellow make the foliage.

SJ8914 Step 35

Flower buds are added with a small filbert brush. Want to find out more about the brushes I like to use? CLICK HERE.

SJ8914 Step 36

The final touch on the Geraniums is to define the individual petals. Pure Cadmium Red Light is used for those illuminated by the sunshine.

SJ8914 Step 37

The Chili Ristras were originally washed in with Alizarin Crimson + Magenta + Liquin. Now they are dry I come back with thick mixes of Cadmium Red Deep + White. I like to add lots of texture, giving shape to the individual peppers.

SJ8914 Step 38

The large green leaves of the Canna Lilies behind the fountain give a dark mass that will accentuate the splashing water. Like the Daylilies I paint the foliage first.

SJ8914 Step 39

The leaves were blocked in before the flowers because the blossoms float above the plant. Mixes of Alizarin Crimson + White make up the fragile Canna Lilies.

SJ8914 Step 40

Using some of the paint leftover from the Geraniums blossoms I let a few petals float in the gentle breeze to the courtyard floor. To see them better you can enlarge the picture by clicking on the image. AND….that’s it for today. It’s been great having you here in the studio. Hope you’ll come back and continue to follow our progress! Hugs,

Mikki Senkarik signature JPEG

Blue Doors and Satillo Tile

October 24, 2014

SJ8914 Step 28

The bright blue door and gates are made of light and dark shades of Pthalo Blue + White. The intense color comes forward from the more muted blues in the distance.

SJ8914 Step 29

The first step in painting the courtyard floor is to cover the entire surface with the light and shadow pattern. The roof mixtures are used for the satillo tiles. Strokes of blue from the door and purple from the Wisteria are made in the shadows to give the impression of them reflecting on the wet tile.

SJ8914 Step 30

The perspective lines of the tile are drawn freehand into the wet paint of the floor.

SJ8914 Step 31

After the horizontal lines separating the tiles are etched into the thick paint of the courtyard floor I start on the Daylilies. These are some of the few flowers I don’t follow my usual FLOWERS FIRST, LEAVES LAST sequence. It would be difficult to paint the long, strap-like leaves around the blossoms. I’ll come back later to paint the “ghost” flowers that are already casting shadows on the wall and door. HMMMM, you never know, Halloween is just around the corner 🙂

SJ8914 Step 32

The painting, still attached to the backing cardboard, is removed from the easel and placed flat on my taboret. I had to shoo Molly off and have to be  extra vigilant while I paint the bottom of the canvas. I don’t want her to jump up and land right in the middle of the wet piece! That’s happened before, once was more than enough. The perspective lines of the tiles are continued over the edge. If you’d like to enlarge this or any of the other pictures just click on the image.

SJ8914 Step 33

WHEW! Getting all those lines straight and in the correct perspective is a challenge. Come join me tomorrow and we’ll do a little gardening. Hugs,

Mikki Senkarik signature JPEG

Wisteria!

October 23, 2014

SJ8914 Step 21

But before we get to the Wisteria we have to make the roof for it to cascade over! My mixes for the terra-cotta roof tiles are as follows. Mixtures #1 and #2. Different proportions of Cadmium Orange + MUD (Ultramarine Blue + Alizarin Crimson) #3. Pthalo Blue + Cadmium Orange + White. #4 and #5. Different proportions of Cadmium Orange + MUD + a little Pthalo Blue + White.

SJ8914 Step 22

The terra-cotta colors are scumbled together on the roof. Then I come back with my large Bright (square) brush and make the textured highlights on the individual tiles. A few strokes of Ultramarine Blue + White are added at the far edge of the roof to make it recede.

SJ8914 Step 23

The walls are constructed and I’ve already blocked in the Wisteria on the roof. I got so involved in painting I forgot to stop and take a progress photo, OPPPS 🙂 The twisted trunk of the vine is drawn into the wet paint of the adobe with a mix of MUD + Liquin.

SJ8914 Step 24

So here we go. The blossom color of the Wisteria is painted first. I use mixtures in various proportions of Dioxazine Purple + White and Dioxazine Purple + Ultramarine Blue + White.

SJ8914 Step 25

Next I paint the foliage around the masses of purple, shaping the draping blooms. I follow this sequence, FLOWERS FIRST, LEAVES LAST on most flowering plants. Painting the blossoms first keeps the color crisp and clean. If the leaves were done first my brush would pick up some of the green as I paint the flowers, muddying their color.

SJ8914 Step 26

The final touch is to indicate some of the individual Wisteria petals. The paint is gently “Laid” on top of the underlying color so I don’t pick up any on my brush.

SJ8914 Step 27

Our wispy wisteria is complete! If you’d like to see the image enlarged just click on the image. Thank you for following along today. Hugs,

Mikki Senkarik signature JPEG

Steppin’ UP

October 21, 2014

SJ8914 Step 16

We’ll begin with the sky. My mixtures are as follows:  #1. Cobalt Blue + White. #2. Pthalo Blue + White. #3. Ultramarine Blue + Alizarin Crimson + White. #4. Cadmium Orange + Ultramarine Blue + White. If you would like to know more about our Double Primary Color Mixing System that Jack developed CLICK HERE.

SJ8914 Step 17

The blue of the sky is done first. Since this piece is going to be painted on to the edges of the gallery wrap canvas I have to pull out my stool to do the top. So I’m Steppin’ UP today! You can see my easel setup here. The easel, palette and taborette are on wheels. This way I can adjust my working furniture to the size of the painting. It’s hard to work though when Molly is sound asleep beside me. I can hear her little snores! Oh, you can click on the picture if you’d like to see it larger.

SJ8914 Step 18

When the sky is finished I “Paint Forward” beginning with the most distant mountain. It’s made bluer so it will recede. The one that is closest is warmer so it advances. Then the landscape is painted. The farthest edge of the Bluebonnets are painted with Ultramarine Blue + White. The part of the field in the foreground is mixes of Cobalt Blue + White.

SJ8914 Step 19

A stream meanders though the limestone rocks. I use mixes of Cadmium Orange + Ultramarine Blue + White for the boulders. A little MUD (Ultramarine Blue + Alizarin Crimson) is added into the shadows.

SJ8914 Step 20

A waterfall splashes into the crystal clear pond below. The limestone rocks at the right of the falls are brought down behind Gragson to accentuate his dark head. Sunlight streams across the water silhouetting both dogs. Thanks for following along today, hope you’ll visit our studio again soon. Hugs,

Mikki Senkarik signature JPEG

From Paper to Canvas

October 19, 2014

SJ8914 Step 8

Here’s my pen and ink sketch for our collaboration. We’re including Denise and Phil’s “Fur Babies” in the painting!

SJ8914 Step 9

To make the transition from the drawing in my sketchbook to the canvas I’ll use an oil wash of MUD (Ultramarine Blue + Alizarin Crimson) + Liquin. That’s the small brownish blob to the left of the paint mix! It’s an alkyd based product that makes the oil paint dry faster.

SJ8914 Step 10

Dipping my brush in the oil wash mixture I begin drawing the Southwestern architecture of the building up on the canvas.

SJ8914 Step 11

The Wisteria dripping over the building and gate is lightly indicated.

SJ8914 Step 12

Now the landscape forms in the background are drawn in.

SJ8914 Step 13

The chili rista is washed in with Alizarin Crimson and Magenta. If you’d like to see this or any of the other images enlarged just click on them. The plants are labeled so I don’t forget what our original plan was 🙂

SJ8914 Step 14

Now for “Baby”, Denise and Phil’s Maine Coon Cat. I block in her shape, nestled on the ledge of the fountain.

SJ8914 Step 15

“Rumsfeld” and “Gragson” are now added. I don’t worry about doing any detail on them at this point. I just want to make sure their sizes and silhouettes correct. If you have any questions please feel free to ask. Hugs,

Mikki Senkarik signature JPEG

Thinking Ahead

October 18, 2014

SJ8914 Step 1

This commission is going to be painted around the edges on a gallery wrapped canvas. We have to think ahead about preparing the piece for shipping! A square is painted on the back of the canvas with White KILZ. This is where I label the piece with the title, our copyright code of authenticity, my signature and a special personalization to the collector. The KILZ paint keeps the Sharpie pen from bleeding through. A hanging wire is attached and then screw eyes are placed into the stretcher bars at the red arrows.


SJ8914 Step 2

Here is a closeup of the screw eye. To make it more convenient for our collectors we also tape wall hangers and nails to the hanging wire.

SJ8914 Step 3

This canvas is 30 inches by 36 inches. A piece of double ply cardboard is cut to 36 inches by 42 inches. The canvas is turned right side up and centered on the cardboard. Then I press down on the canvas, the screw eyes make indentations in the cardboard. If you will enlarge the image (just click on the picture) you can see an arrow drawn on the canvas. It’s directly to the right of my hand. This was penciled on when I labeled the canvas, it indicates the top of the piece. The arrow insures the painting will be in the same orientation as the label on the back. Believe me, I’ve made the mistake of not marking the top of the canvas and ended up making a painting with an upside down label on the back 🙂

SJ8914 Step 4

The indentations are enlarged with an ice pick.

SJ8914 Step 5

The canvas is placed back on the cardboard, the screw eyes pushed through the holes and nails are placed in them. This anchors the canvas securely to the backing board.

SJ8914 Step 6

Tape is placed over each screw eye and nail to make sure they stay in place.

SJ8914 Step 7

Now the complete unit is put up on the easel. Molly, our studio supervisor, is in her official spot. We’re ready to begin painting. We’ll get going tomorrow, hope you’ll come watch. If you would like to receive an email every time I publish a new post please feel free to subscribe to my blog. CLICK THIS LINK and scroll to the upper right side of the page. You will see a heading EMAIL SUBSCRIPTIONS. Just enter your email address and click the button “Sign me up!”  It’s easy. And if you enjoy my blog please CLICK the FaceBook LIKE Button. As we say in Texas, “Much Obliged!

Mikki Senkarik signature JPEG