Archive for February, 2016

Revel in the Sun

February 29, 2016


SB0716 Revel in the Sun Step 20

The Chili Ristras are now painted with thick, opaque brushstrokes. The individual peppers are delineated with plenty of texture.

SB0716 Revel in the Sun Step 21

The Hollyhock blossoms are blocked in with mixes of Magenta + Dioxazine Purple + White and Magenta + White. The flowers are extended over the sides of the canvas.

SB0716 Revel in the Sun Step 22

After the foliage is painted the tall, distinctive stalks bearing the seed pods are added.

SB0716 Revel in the Sun Step 23

Yellow stamens complete the happy Hollyhock flowers.

SB0716 Revel in the Sun Step 24

Sunflowers give a cheerful welcome on the left side of the door. I use the same sequence Flowers First, Leaves Last to block them in.

SB0716 Revel in the Sun Step 25

Ms. Chippers looks down on the pretty kitty, she’s careful to stay out of reach.

SB0716 Revel in the Sun 14x14Revel in the Sun           14 inch by 14 inch

Mr. Chippers, the bright red male Cardinal, balances on the broad leaves of the Sunflower while Sasha enjoys her Revel in the Sun! We’re done. I really appreciate you visiting our studio today. AND…..HAPPY LEAP DAY! Lots of Hugs,

Mikki Senkarik signature JPEG

http://www.senkarik.com

Sweet Sasha

February 26, 2016

SB0716 Revel in the Sun Step 12

The floor of the courtyard is cobblestone so I make the brushwork very textured. The shadow area is painted first, the area under the flowers is made bluer so it will “lay” back under the bushes.

SB0716 Revel in the Sun Step 13

Next the sunlit portion of the floor is painted.

SB0716 Revel in the Sun Step 14

The image extends over the sides. The canvas, still attached to the backing cardboard, is placed flat on my taboret in order to paint the edge. You can see how having the piece on the cardboard makes it easier to move while the paint is wet.

SB0716 Revel in the Sun Step 15

Now for that sweet, sweet Sasha, sunning herself on the window sill. The basic gray of her fur is blocked in first with mixes of Ultramarine Blue + Cadmium Orange + a little MUD (Ultramarine Blue + Alizarin Crimson) + White. Please remember, you can click on this or any of the other images to see them larger.

SB0716 Revel in the Sun Step 16

The darker areas of her coat have a little Ivory Black added into the other mixes. The features of her face are indicated with a fine liner brush.

SB0716 Revel in the Sun Step 17

Jeana’s special fur baby is finished. The red Geraniums in the container below her are blocked in Flowers First, Leaves Last.

SB0716 Revel in the Sun Step 18

The Purple Asters nestled along the wall at the base of the chili ladder are painted with the mixtures shown above. #1. Cadmium Orange + Cadmium Red Light and Cadmium Orange + Cadmium Yellow Medium. #2. Three shades of Pthalo Blue + Cadmium Orange + White. #3. Mixes in various proportions of Dioxazine Purple + White. #4. Pthalo Blue + Liquin. #5. Pthalo Blue + White.

VIDEO: Painting the Purple Asters.

SB0716 Revel in the Sun Step 19

We’re done for today. Thank you for following along! Hope you’ll come back and visit our studio soon. Hugs,

Mikki Senkarik signature JPEG

http://www.senkarik.com

Adobe and Wisteria

February 23, 2016

SB0716 Revel in the Sun Step 5

The adobe building is painted first with mixes of Cadmium Orange + Ultramarine Blue + MUD (Ultramarine Blue + Alizarin Crimson) + White. More MUD is added to darken the shadows. Don’t forget, you can click on any of the pictures to see them larger!

SB0716 Revel in the Sun Step 6

After adding the tile roof I come back and drag the poles and cross bars of the ladder into the wet paint of the adobe wall.

SB0716 Revel in the Sun Step 7

The window and door are made with light and dark shades of Rembrandt Phthalo Turquoise Blue + White.

SB0716 Revel in the Sun Step 8

Resting my wrist on the mahl stick to steady my hand I delineate the willow stick uprights in the window of the door.

SB0716 Revel in the Sun Step 9

Now for the wispy Wisteria. The mixes for the flowers are several combinations of Dioxazine Purple + Ultramarine Blue + White. The foliage colors ,#2, are Cadmium Yellow Medium + Pthalo Blue. #3. A thin mix of Pthalo Blue + Liquin which will be used to add cool, darks in the depth of the leaves.

SB0716 Revel in the Sun Step 10

At the top right you can see how I’ve blocked in the Flowers First. On the other side I’m painting the Leaves Last. I work around the blossom color, helping to give them shape.

SB0716 Revel in the Sun Step 11

The last step in painting the Wisteria is to indicate the individual petals of the flowers. Then the trunk, limbs and ladder are highlighted. I appreciate you following along. Please feel free to ask questions, this blog is for you! Hugs,

Mikki Senkarik signature JPEG

http://www.senkarik.com

A Santa Fe Spring

February 20, 2016


SJ4515 Tending the Garden 14x14

We’re beginning a new commission piece today. This will be the third in a grouping of five.  Here is the first one, Tending the Garden, which represents Fall.

SK4715 Silent Sentry 14x14

The second piece is Silent Sentry. The group progresses through the seasons in Santa Fe, each painting includes some of Jeana’s “Fur Babies”.

SB0716 Revel in the Sun Step 1

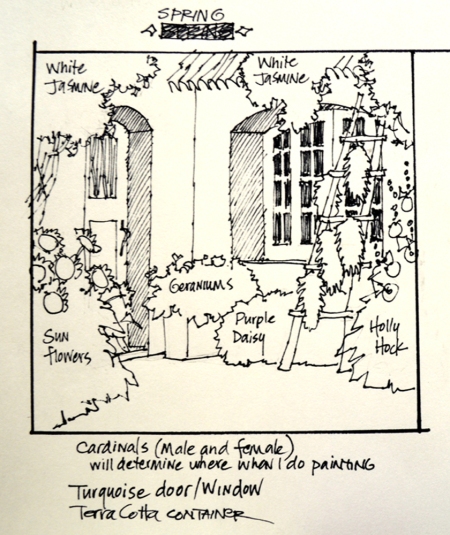
Now for Spring, my sketch is shown above. The finished painting will be 14 inches by 14 inches, the same as the rest in the series.

SB0716 Revel in the Sun Step 2

I begin drawing the basic plan on the canvas with a brush dipped in a thin oil wash of MUD (Ultramarine Blue + Alizarin Crimson) + Liquin.

SB0716 Revel in the Sun Step 3

The Chili Ristras are blocked in with a wash of Alizarin Crimson + Liquin. The individual peppers are indicated by “Lifting” the color off with a clean brush.

SB0716 Revel in the Sun Step 4

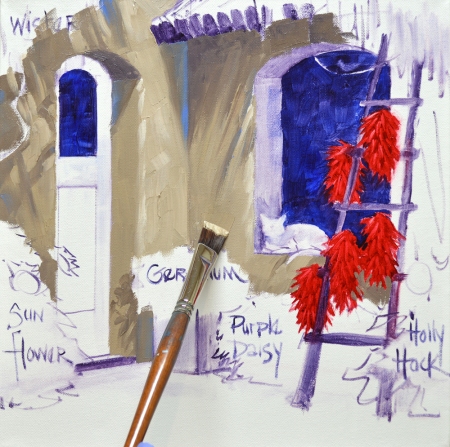
The openings of the door and window are washed in with mixes of Ultramarine Blue + Liquin and MUD + Liquin, making sure the area is not totally opaque. All of the flowers are labeled as a reminder of what direction I need to go as I paint. I’ve been known to forget! If you would like to receive an email every time I publish a new post you can subscribe to my blog. CLICK THIS LINK and scroll to the upper right side of the page. You will see a heading EMAIL SUBSCRIPTIONS. Just enter your email address and click the button “Sign me up!”  It’s easy. And if you enjoy my blog please CLICK the FaceBook LIKE Button. As we say in Texas, “Much Obliged! Hugs,

Mikki Senkarik signature JPEG

http://www.senkarik.com

The Boys

February 15, 2016

SB0616 Step 18

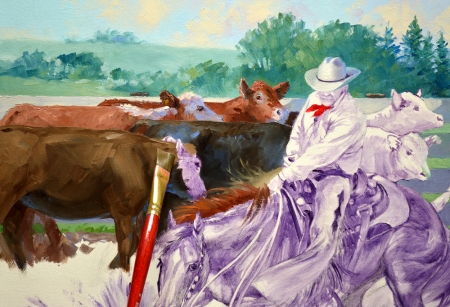
The steer in the foreground is made a deep brown that will be there but not grab your attention. He is basically part of the Threshold shadow across the front of the painting.

SB0616 Step 19

Craig’s face is painted with mixtures of Terra Rosa + MUD (Ultramarine Blue + Alizarin Crimson) + White. Blue from his shirt reflects up onto the side of Craig’s face and his chin.

SB0616 Step 20

Jack loves to experiment with new colors. Digging through some of our extra paint I found a color I hadn’t used before, BLUE LAKE. I mixed it with White and loved the result. It’s perfect for Craig’s shirt. Please remember, you can click on any of the images to see them larger.

SB0616 Step 21

My color mixes for Chunky are shown above. #1. MUD + Liquin. #2. Ultramarine Blue + Cadmium Orange + MUD + White. #3. Ultramarine Blue + White. #4. Two mixes of Burnt Umber + Burnt Sienna. #5. Burnt Sienna + White. #6. Mix #5 + more White. #7. Burnt Sienna + Terra Rosa + White. #8. Burnt Sienna + MUD.

SB0616 Step 22

A few days after starting to work on this piece I received an email from Craig, the recipient of the Christmas painting.

Dear Mikki,

I’m Craig Ellis and I cannot wait to see this painting. My wife always manages to find a way to express her care and love with her gifts but this one is particularly moving and important to me.

My horse was severely injured in an accident about a year ago and I have not been able to compete on him since. We still do not know if he’ll ever step back into the arena. This is a heartbreaking thing for any horseman but the idea that I will have a painting of him in his prime lessens the pain.

Now I’ll be able to look upon this painting and remember him when he was the very image of power and grace. This means more to me than I can find words to express. I thank you…and I thank my loving, thoughtful wife for making this possible.

Craig

Being such a horse lover my heart broke, Sarah hadn’t told me of Chunky’s accident when she commissioned me to do the piece. Nosy me, I had to find out more so I asked Craig what happened. Here is his reply:

Well, somehow or another Chunky got his left rear hoof caught in his halter. He strained so hard to free himself that he tore some ligaments and soft tissue in his left flank – the inner flank, abductor muscles, specifically. He is so powerful and determined…determined like you cannot believe…that he did himself more harm than perhaps another horse would have done.

The injury was pretty severe. I could not ride him at all for about eight months. Slowly I’ve been working him and trying to “condition” him and spur the growth of muscle tissue. He is slowly, slowly, slowly gaining ground. I can walk/trot him an hour at a time and in a couple months I’ll be able to lope him out a little. I’m hopeful that by the end of this season he might be ready to try a little cutting practice. There is a possibility he might compete again but, if so, it will not be until spring of 2017. The good news is that he will probably be rideable for pleasure even if he’s not able to compete.

It is truly sad because he is a spectacularly strong and competitive cutter. He will give you a ride that is positively electrifying…just make your heart pound. He is the finest horse I’ve ever ridden.

Thank you for your kind words and thoughts, I do sincerely appreciate them. Sarah is the love of my life. Lord only knows what she found in me but I’m easily the luckiest man alive.

SB0616 Step 24

I always put my heart into my paintings but this one has an extra measure of love mixed in with the paint.  What a magnificent horse! I’ve never had the thrill of riding a cutting horse but the experience must be truly incredible. And Craig and Sarah are an amazing couple. God has certainly blessed us by allowing me to work with such special people.

SB0616 Step 25

Now Chunky’s legs are in I complete the dust he’s kicking up. The background is dry so I  drag the clumps of dirt, highlighted by the sun, over the darkness behind.

SB0616 Step 26

The fringe on Craig’s chaps dances and swirls with all the extreme action. Finishing out the saddle is all I have left to do.

SB0616 The Boys 18x24The Boys                  18 inches by 24 inches

And….we’re done. The Boys can continue to do the work they so love. I want to thank Sarah for asking me to paint Craig and Chunky, I feel so very honored to be able to capture Starlight Merada at his best. If any of you would like me to do a portrait of your horse, please feel free to contact me at Senkarik@Senkarik.com

I want to also all of you to know I appreciate you following my blog. As we say in Texas, “Much Obliged!” HUGS,

Mikki Senkarik signature JPEG

http://www.senkarik.com

ALL SENKARIK IMAGES ARE PROTECTED UNDER INTERNATIONAL COPYRIGHT LAW


The Milling Herd

February 10, 2016

SB0616 Step 12

Today I’m painting the cattle milling behind Chunky and Craig. My standard Double Primary colors are lined up across the top of my palette. But I’ve pulled out some hues I don’t normally use: Burnt Umber, Burnt Sienna and Ivory Black. #1. Ultramarine Blue + White. #2. A couple of mixes of Burnt Umber + White. #3. Three shades of Burnt Umber + Burnt Sienna + White. #4. Variations of Ivory Black + White. By the way, if you’d like to learn more about the Double Primary Color Mixing System that Jack developed CLICK HERE.

SB0616 Step 13

I’ve added some extra Ultramarine Blue into the mixtures for the steers against the fence. This mutes the Sienna, making them recede. Please remember as you read through my blog, you can click on any of the pictures to see them larger.

SB0616 Step 14

The two steers immediately to the left of Chucky are made with the Burnt Umber and Ivory Black mixes. They will provide a nice dark to accentuate this pretty boy’s bright sorrel coat!

SB0616 Step 15

More dark steers are in the background to the right. Again, their muted colors will make the horse stand out.

SB0616 Step 16

Light streams across the arena, coming into the painting from the left. The dirt is made of mixes of MUD (Ultramarine Blue + Alizarin Crimson) + Cadmium Yellow Medium + White.

SB0616 Step 17

I’ll wait to finish the dirt kicked up around Chucky until I paint him. Then I can make the flying dust soften the lower part of his legs. I’ve allowed a shadow to fall across the front of the painting, this acts as a Threshold. Think of standing outside of your home on a warm summer night. The front door is open, revealing the brightly lit interior. Your eye is pulled across the expanse of darkness, over the Threshold of the opening to the bright light inside. It works the same way in a painting. Your gaze will be dragged over the foreground shadow to the sunlight illuminating Chunky, Craig and the flying dust. This helps to do two things, focus attention on the main subject of the piece and also add depth to the painting. As Jack would say, “That’s your lesson for today!” Thank you for following along today. Hugs,

Mikki Senkarik signature JPEG

http://www.senkarik.com


OPPPS!

February 9, 2016

ParisFairHighPoint (Large)

Here are Craig and Chunky after a winning performance. Sarah sent this shot to give me an idea of the Midwestern landscape that we’ll put in the background.

SB0616 Step 8

I got so excited about starting to paint today I forgot to take some step-by-step pictures while I was working on the sky. OPPPSSSSS! The sun pours into the piece from the left so the blue of the sky on that side is White + Pthalo Blue. Moving further to the right the blue, made of White + Cobalt Blue, is just a little darker. The clouds are soft mixes of White + Cadmium Orange + Ultramarine Blue and White + MUD (Ultramarine Blue + Alizarin Crimson). They are painted wet-into-wet over the blue, which makes them soft and fluffy. Then I begin blocking in the trees and distant landscape with mixes in various proportions of Pthalo Blue + Cadmium Orange + a touch of MUD + White.
SB0616 Step 9

The hard edge where land meets sky is softened by dragging it with a clean brush. This makes the horizon line fall way back into the distance. You can click on the picture to see it larger.

SB0616 Step 10

I placed a grouping of dark trees behind Craig to accentuate his creamy white Stetson. My wrist is resting on my mahl stick, stabilizing my hand as I paint. What is a mahl stick? CLICK HERE to find out.

SB0616 Step 11

The background is complete. Notice the taller trees on the far right. Their dark, upright shape stops the sunlight, streaming into the scene from the left, from taking your gaze out of the painting. When we are totally finished they, along with the fence post and steer in the foreground will direct your eye back to the focal point, the action of Craig and Starlight Merada! Hugs,

Mikki Senkarik signature JPEG

http://www.senkarik.com

The Thrill of Cutting

February 5, 2016

CraigEllis-Web-3

Back to horses! This commission is actually a Christmas present. My collector was so nice, she was willing to wait until I could work the painting into my schedule. We came up with a special Gift Certificate to give her husband on Christmas morning. The fun thing is now Craig will get to follow along as I paint the portrait of him and Starlight Merada (Chunky) in action.

SB0616 Step 1

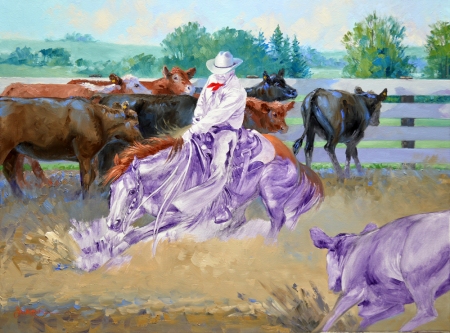
Sarah really liked the action in the photograph shown in the first picture. But she wanted it all to take place outdoors. That’s the wonderful thing about painting, we can make the world as we want it to be. Here’s my sketch. I moved the calf in the foreground to show more of Chunky. Besides, I didn’t want the backside of the steer to be the focal point of the painting.

SB0616 Step 2

First, the composition is lightly sketched with pencil on the canvas.

SB0616 Step 3

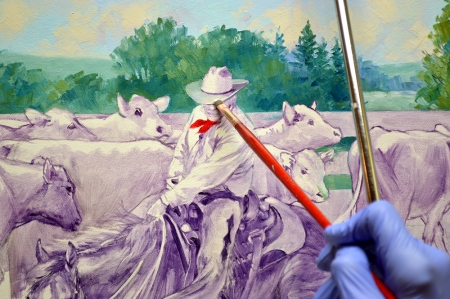
Now I begin drawing the herd milling around behind Craig and Chunky. A thin oil wash made of MUD (Ultramarine Blue + Alizarin Crimson) + Liquin is used. I’ve primed the canvas with White acrylic which makes the surface slightly slick. This allows me to wipe off any errant lines.

SB0616 Step 5

One thing I really like about working on the acrylic primed canvas is that I can “Lift” highlights out of areas that have been washed in. This technique comes in especially handy when blocking in Chunky’s gleaming coat. As you read though the blog please remember, you can click on any of the pictures to see them larger.

SB0616 Step 6

With all that action going on there will be lots of dust flying!

SB0616 Step 7

The portrait of Craig and Chunky is completely washed in. We’ll begin painting in the next session. Hope you’ll come back and watch. To move through my blog just CLICK on the small titles at the top of the page. The right one for the next post or the title on the left side for the previous session. If you would like to receive an email every time I publish a new post you can subscribe to my blog. CLICK THIS LINK and scroll to the upper right side of the page. You will see a heading EMAIL SUBSCRIPTIONS. Just enter your email address and click the button “Sign me up!”  It’s easy. And if you enjoy my blog please CLICK the FaceBook LIKE Button. As we say in Texas, “Much Obliged! Hugs,

Mikki Senkarik signature JPEG

http://www.senkarik.com

ALL SENKARIK IMAGES ARE PROTECTED UNDER INTERNATIONAL COPYRIGHT LAW

Just in Time for Valentine’s Day

February 1, 2016

SA0116 Romantic Reflection sketch

I’m listing a piece for our eBay collectors just in time for Valentines! I rarely do figures so this piece is especially fun for me. Many of you may not know this but I began my art career as a Medical Illustrator. So all of the anatomy I learned at the Medical College of Georgia comes in handy! Here is my initial sketch on canvas.

If you’d like to go directly to the auction CLICK HERE.

SA0116 Romantic Reflection14x11

Walking through a secluded courtyard our lovely lady has taken a moment to sit and enjoy the fragrance of the flowers, reflecting on their beauty. Since I don’t paint figures very often here is your opportunity to own an original Senkarik figurative piece. February 14th is just around the corner, gift that special someone in your life with a Valentine of Romantic Reflection. They will see an expression of your love every time the recipient views Romantic Reflection on their wall. I’ll even personalize the back of the painting to the person you are giving it to. Just let me know as soon as possible after you win!

SA0116 Romantic Reflection showing tape

Romantic Reflection measures 14 inches tall by 11 inches wide. Please remember, you may click on any of these images to view them larger.

SA0116 Romantic Reflection left side

AND…. you don’t have to worry about framing. Romantic Reflection is painted on a gallery wrapped canvas with finished sides. It’s wired and ready to hang on your wall; we even provide the hanger and nail.

This original oil painting would retail in our galleries for $790 but to make it more fun we are starting the bidding at 1 cent. That’s right, ONLY A PENNY! But don’t linger, the auction ends Sunday evening, February 7, at 8 PM Central Time! This way we can make certain it arrives in time for Valentine’s Day!

CLICK HERE to go directly to the auction.

Happy Bidding,
Mikki Senkarik signature JPEG